
The Oral Care Routine Dentists Wish Their Family Members Had Followed Before Losing Their Teeth!
Just like the stomach or intestines, your teeth and gums are a full-fledged organ. Unfortunately, it’s also the first organ to go bad, the most painful during a toothache, and the least likely to recover once a tooth is damaged. Teeth and gums fail early, cost a fortune to fix, and quietly undermine our health and appearance long before we connect the dots.
I’ve been studying oral health for a long time because gut health starts (and often ends) with the mouth. Tooth decay and gum disease cascade down the stomach and intestines and spread out to the sinuses, ears, and lungs, making the entire body more vulnerable to respiratory disorders such as the common cold, flu, or pneumonia.
That's, incidentally, one of the reasons why COVID-19 hit people over 50 the worst — by that age, dental problems become nearly universal.
Adding insult to injury, tooth pain, missing teeth, and poorly fit dentures compromise chewing. When foods aren’t properly chewed, they aren’t properly digested either. That, in turn, leads to dyspepsia, gastritis, peptic ulcers, delayed stomach emptying, heartburn, even more tooth damage from gastroesophageal reflux, and, eventually, leads to duodenitis, enteritis, inflammatory bowel disease, and the quality of life we wish for our enemies.
Just like most people my age, I, too, have experienced the brunt of some of the problems mentioned above, and I wrote this essay to help you and your family avoid my mistakes.
Key Takeaways Before You Begin
The Oral Care Routine described in this guide is a physiological and preventive approach to maintaining teeth and gums for life. It is based on correcting the everyday factors that silently damage oral tissues and replacing them with simple, low-cost habits that protect and restore dental health.
With this foundation in place, keeping your teeth and gums healthy becomes predictable and lasting. Success no longer depends on expensive treatments, aggressive cleanings, or repeated restorations, but on restoring the mouth’s natural balance and protecting it from unnecessary trauma.
Here is what you are going to learn in this article:
Dental cleanings accelerate gum disease, caries, tooth loss, and halitosis. Ultrasonic scalers and abrasive polishing erode enamel, expose roots, deepen gum pockets, and loosen old restorations. Repeated cleanings make teeth more sensitive, weaken gums, and fuel the very problems they are meant to prevent.
Semiannual dental cleanings balloon in cost. At $125 per visit, two per year from age 20 to 70, compounded at 6% annual inflation, the lifetime cost reaches about $72,584 in today’s dollars. This figure excludes x-rays, exams, fluoride, anesthesia, travel, missed work, and the hidden costs of damage from repeated cleanings. If you live in a major metropolitan area like New York or Los Angeles, expect at least double that amount.
The cost of neglect extends far beyond cleanings. Lifetime out-of-pocket dental care for a single adult, excluding routine cleanings, ranges from $51,000 to $95,000, not accounting for implants, veneers, orthodontics, or cosmetic work. A single deep cleaning ($600–$1,400), crown ($800–$2,000), implant with crown ($3,100–$5,800), or full set of dentures ($1,000–$8,000) can each rival or exceed the cost of years of preventive care. Prevention avoids these cumulative expenses. The numbers above aren’t adjusted for inflation.
Nutritional deficiencies accelerate oral health decline. Low intake of vitamins C, D, K2, and B-complex, along with calcium, magnesium, and trace elements, weakens gum tissue, slows collagen repair, and blocks enamel remineralization. Deficiencies increase bleeding gums, deepen periodontal pockets, and make cavities and tooth loss far more likely, even with good hygiene.
Gum disease, not cavities, is the main driver of tooth loss. Nearly half of adults over 30 show signs of periodontitis, which silently erodes bone and ligaments that anchor teeth. By the time gums recede or teeth loosen, the damage is advanced and often irreversible, making prevention the only effective defense.
Daily habits matter more than annual cleanings. Ultra-soft brushes, gentle floss, tongue cleaning, low-pressure water irrigators, and non-abrasive toothpastes lower bacterial load and protect teeth without damaging gums or enamel.
Chewing and digestion depend on healthy teeth. Missing or damaged teeth leave food insufficiently broken down before it reaches the stomach. This problem prolongs gastric digestion and contributes to indigestion, reflux, gastritis, gastroparesis, ulcers, enteritis, and compromises nutrient absorption.
Oral health is inseparable from overall health. Tooth decay and gum disease raise the risk of digestive, respiratory, and systemic disorders, and strain immunity by allowing pathogenic bacteria to reach the bloodstream. Preventing oral inflammation strengthens immune defenses, slows aging, and improves overall quality of life.
Dental rinses, antibiotics, and acidic drinks disrupt the oral microbiome. Alcohol-based rinses, antibiotic courses, and frequent use of soda or fruit juices strip away protective bacteria and lower saliva pH. This shift encourages fungal overgrowth and pathogenic strains, weakens enamel, accelerates gum inflammation, and leaves the mouth more disease-prone regardless of good hygiene.
Chronic oral inflammation accelerates aging. Ongoing gum disease keeps the body in a state of low-grade inflammation that strains blood vessels, disrupts blood sugar control, and weakens tissues. In turn, these conditions elevate the risk of heart disease, diabetes, memory loss, and physical decline.
Bad breath (halitosis) damages relationships and careers. The affected person usually cannot detect it, while coworkers, friends, and family members notice but are too embarrassed to mention it. This silence allows the problem to persist and strain relationships over time.
The oral cavity acts as a bacterial breeding ground. Tongue coatings harbor dense bacterial colonies that cause most cases of chronic halitosis. These bacteria also migrate into gum pockets, where they cause tissue decay and ensuing bad breath.
Morning bad taste is an early warning sign of gum disease and bacterial overgrowth. It develops overnight as bacteria thrive in a dry mouth and release sulfur compounds. This symptom appears long before gums begin to bleed and recede.
Traditional lifestyles protected teeth naturally. Hundreds of millions in rural societies keep healthy teeth and gums for life without dentists, toothbrushes, or cleanings. Cavities and gum disease are modern disorders driven by added sugar, acidic foods, and invasive dental interventions. The recommendations on this page take you closer to that kind of natural dental hygiene in the contemporary world.
“Do no harm” is the only lasting strategy for preserving your natural teeth for life, just as people in the past have done for millennia. It is also nearly cost-free, provided you start early and remain consistent.
Here is what else you will learn from this page:
-
How to reduce bacterial and viral load in the mouth and reverse dry mouth symptoms.
-
How to eliminate bad breath (halitosis) and maintain a clean oral environment.
-
How to reduce or eliminate tooth sensitivity and the chronic discomfort that so often goes ignored.
-
How to prevent cavities and gum disease from taking root and progressing.
-
How to heal gum inflammation, stop their bleeding, tighten periodontal pockets, and halt further recession.
-
How to slow plaque and calculus buildup on exposed root surfaces.
-
How to eliminate the need for routine dental cleanings and other painful interventions.
Accomplishing all of the above goals will reduce oral inflammation, strengthen your immunity, increase energy, and protect your appearance and quality of life. They are simple, safe, inexpensive, and target the most common causes of tooth decay and gum disease with surprising effectiveness.
Who Am I to Tackle This Subject?
I’ve been involved in the technology, business development, and marketing side of dental practice development for Dr. Lawrence Avramenko, my late dentist and close friend since 1980.
Dr. Avramenko was an early adopter of technologies that wouldn’t become mainstream for decades: minimally invasive dentistry, composite fillings, digital x-rays, root canal treatments without arsenic, the rejection of dental amalgams, digital patient records, and more.

Dr. Lawrence Avramenko (1944—2025) with his wife Klrara.
He even patented a guidance tool for high-precision restorative work that gave him submillimeter control while working on a tooth, long before digital milling systems or CAD/CAM workflows became widespread.
Over the years, we had countless conversations about his work. Thanks to his skills and precision, I was able to preserve most of my teeth despite having three crowns and over a dozen fillings before my twentieth birthday.
The dental work he performed in my twenties and early thirties remained intact for nearly thirty years—about three times the average lifespan of most fillings and crowns.
He retired in the early 2010s, and since then, I’ve continued treatment with several other progressive dentists.
What happened before we met shaped my understanding of this complex subject from a forensic perspective, similar to how I’ve approached digestive disorders.
The Harder I Cared for My Teeth, the Worse They Became...
I was born in 1954 and raised in a middle-class family in Lviv, Ukraine. My parents were professionals. I was fortunate to get a good school education and a pharmacy degree from a local medical university.
My dentist was a friend of my mother and the dean of the dental school. She was considered the best of the best. When I needed my first crowns, she sent me to her dentist.
Following my mother’s wishes, I meticulously brushed my teeth twice a day since I could remember myself. Except for one lower premolar that grew outside the dental arch and was extracted in my late teens, the rest were perfectly developed and tightly spaced.
Yet by the time I arrived in the United States at age 24, I already had three crowns and at least a dozen fillings, including three on my upper front incisors. Nothing unusual for young men of my generation who grew up in circumstances similar to mine.
My partner in a software development company unrelated to GutSense.org was born in a rural village in southern India. His family of four lived in a two-room shack with a kitchen and bathroom outside. He attended the local village school, where all students from the first eight grades shared a single classroom with an earthen floor.
His family later moved to a nearby town so he could pursue a college education. He’s now 34, solidly middle class, and has a family of his own. Better looking than most Bollywood stars, he never brushed his teeth growing up. Yet he has no cavities, no dental plaque, perfect gums, and a sparkling Hollywood smile.
He likely followed an ancestral diet into his teens, but for the past two decades, he’s lived in a large city and eaten a typical modern Indian diet—high in carbs, sweets, processed snacks, and sugary fruits year-round. Still, his teeth and gums remain flawless, without ever seeing a dentist or hygienist.
In my case, thanks in part to Dr. Avramenko, I still have 30 of my original teeth, one implant, seven crowns, and only eight teeth are still without fillings. My gums have receded significantly since my late twenties, shortly after I was first introduced to a dental hygienist. I will explain later why.
Since 2015, I’ve spent close to $30,000 redoing failing fillings, root canals, and crowns from the prior 45 years of meticulous dental care.
My case illustrates a common but rarely acknowledged reality: even with consistent care by the best dentists money can buy, modern dentistry often leads to a cycle of fillings, then more fillings, then root canals, crowns, implants, and, eventually, partial or complete dentures. It's not neglect that drives this cycle, but the cumulative damage from all of those well-intentioned treatments.
Receding gums without active periodontal disease resulted from aggressive brushing with a hard toothbrush, abrasive toothpaste, and dental cleanings. Each mechanical intervention, even when necessary, compromised the structural integrity of the teeth and surrounding gum tissue.
My recent $30,000 expense isn’t an outlier either for someone living in the heart of the New York metropolitan area, but a logical endpoint of a system that treats early and often but rarely steps back to ask whether the underlying model of dental care is effective.
And when it comes to the amazing dental health of my partner in India, the modern understanding that teeth will go bad without daily brushing, regular dental cleanings, and annual checkups is a recent invention, not an actual necessity.
Humans, like other mammals, evolved without toothbrushes, dentists, and hygienists. Cats, dogs, and wild animals in zoos don’t brush their teeth, yet almost all retain them into old age unless their diets or breeding are distorted by domestication.
Ironically, never seeing a dentist or hygienist in his life, my partner may have helped himself to preserve his teeth, while mine were damaged from the get-go by doing everything by the book.
In other words, even in the absence of modern dental hygiene, the human mouth can remain perfectly healthy for life. My partner and hundreds of millions of people like him growing up in rural villages prove that.
When it Comes to Dental Health, it Feels Like God Cursed America
Could I or anyone else have saved their teeth and gums without dental care?
Unfortunately, no, because our Western lifestyles, preventative dental care, and diets are so conducive to tooth and gum disorders.
Let’s start with dental care at home and the doctor’s office:
-
The abrasive tooth powder and, later, toothpaste wore down enamel and set off the vicious cycle of cavities in my teens. Microscopic grooves in worn-out enamel are an ideal breeding ground for cavity-causing bacteria.
-
Hard toothbrushes, which I used for most of my life, believing they were more effective, caused mechanical damage to my gums and accelerated their recession.
-
Aggressive flossing with high-friction floss caused repeated trauma to the gumline and likely contributed to the progression of recession and early-stage periodontal damage.
-
Dental rinses with high alcohol content disrupted the healthy bacterial balance in my mouth, weakening its natural defense against pathogens in food and air.
-
Ultrasonic scalers damage enamel and dentin on exposed root surfaces, which is so common in people with receding gums. They also risk loosening old fillings, crowns, or veneers and increasing tooth sensitivity, especially when roots are exposed.
-
Dentists and hygienists had polished my teeth with abrasive paste that would gradually wear out even more enamel, leaving my teeth unprotected and extremely sensitive to cold, hot, and acidic foods.
A typical Western lifestyle exacerbated the damage:
-
Tar and nicotine from smoking irritated my gums, reduced blood flow, and impaired healing. Over time, this constant exposure accelerated gum recession and fostered bacterial overgrowth, especially in ever-deepening periodontal pockets. I quit smoking when I was 30 years old, but the damage was already done.
-
Alcohol consumption and elevated blood sugar from a vegetarian diet led to chronic dry mouth. This condition reduced my mouth’s natural acid buffering capacity and exposed enamel to acids and sugars in foods and drinks for longer periods.
-
Eating snacks every few hours kept the oral environment in a constant acidic state, especially with processed carbs or sugary foods, preventing enamel from remineralizing between meals.
-
Sipping fruit juice, soda, and sweetened coffee throughout the day created prolonged acid exposure, which eroded enamel and fed acid-producing bacteria.
-
Mouth breathing because of chronic nasal congestion dries out oral tissues, reduces saliva flow, and increases the risk of cavities and gum inflammation.
-
Teeth grinding and clenching (bruxism) cause decayed enamel and cracked fillings and contribute to gum recession and jaw pain. These conditions were usually caused by constant stress and ensuing high levels of stress hormones.
-
Broad-spectrum antibiotics disrupted the balance of oral and gut microbiota. In the mouth, this can wipe out protective bacteria and allow pathogenic strains to take hold, increasing the risk of fungal infections, inflammation, and tooth decay.
-
Filtered and demineralized drinking water lacked the buffering and remineralizing effects of natural mineral-rich water and reduced the mouth’s natural defenses from cavities.
The Western diet has further contributed to long-term damage:
-
Soft drinks eroded enamel with phosphoric and citric acid while feeding cavity-causing bacteria with sugar. Diet versions are just as acidic and damaging.
-
Hot and cold beverages cause continuous expansion and contraction of tooth structures, which leads to micro-fractures and eventually compromises fillings, crowns, and veneers.
-
Juices and smoothies loaded with natural sugars and acids were even worse offenders. Their sticky texture coats teeth, especially when sipped slowly, extending acid exposure.
-
Ice cream and other frozen desserts are high in sugar and are often consumed slowly, creating prolonged bacterial activity and temperature-driven damage.
-
Sticky foods like dried fruit, caramel, and granola bars cling to teeth and stay lodged between them, giving oral bacteria a long window to ferment sugars.
-
Artificial colors and flavorings may not directly cause tooth decay, but they can disrupt the oral microbiome and irritate soft tissues, especially with frequent exposure.
-
Sugar, sugar, and more sugar are added to nearly all processed foods, including baked goods, sauces, yogurt, and so-called healthy snacks. The constant exposure to these foods keeps bacteria active and tooth enamel under attack.
-
Acidic condiments such as vinegar-based dressings, ketchup, mustard, and hot sauces slowly dissolve enamel, especially with daily use. They also get trapped in periodontal pockets and, along with bacteria, gradually destroy the connective tissue that holds the tooth in the socket.
-
Ultra-processed starches from white bread, crackers, chips, and cereal break down into sugars almost immediately and often stick between teeth more aggressively than sweet foods. I also recall frequent obstruction and inflammation of my salivary glands after eating high-fiber cereals, with devastating effects on saliva production.
-
Nighttime snacking, especially with carbs or sweets, leaves food residue in the mouth when saliva flow is at its lowest, promoting overnight damage that adds up over time.
No wonder, then, that with the kind of dental hygiene, lifestyle habits, and diet that I described above, dental disorders in the United States have reached beyond epidemic proportions. Past age 60, almost all American adults are missing some or all of their teeth due to advanced gum disease, failed dental restorations, tooth decay, and dry mouth from chronic conditions like diabetes and hypertension.
Here are the United States dental health stats:
-
Cavities (dental caries) are nearly universal. By age 65, 96% of adults have experienced dental caries, and about 20% have untreated cavities.
-
Gum disease affects roughly 66% of adults aged 65 and older. About 12% suffer from severe periodontitis.
-
Tooth loss is widespread. The average adult in this age group has 20.7 remaining teeth, which makes partial tooth loss the norm. Complete tooth loss affects more than 17%.
What’s tragic is that all of these conditions are entirely preventable and avoidable, even by the poorest of the poor in rural societies.
And that is the message and knowledge that I want to share with you so you, too, can preserve your teeth, protect your gums, save your money, and safeguard your digestive health.
If what I recommend makes sense for your situation, try some or all of my recommendations and judge the results for yourself. If your teeth and gums improve over the next few months, you’ll have your answers.
For the record, I am obviously not a dentist. I’m not affiliated with any dental clinic. I won’t refer you to any doctor. I don’t sell anything related to this subject except for optional basic supplements available on this site, but you can buy similar formulations just about anywhere.
I only recommend what I’ve been using for years and what has helped me retain most of my patched-up teeth despite decades of damage from following conventional advice.
Do I know more than dentists? Absolutely not. My expertise is in how to avoid ever needing one, excluding accidents. Their expertise is in treating preventable dental disorders. Big difference.
I can assure you that any dentist or hygienist reading this page would almost immediately confirm to you that my recommendations are correct because they are based on the basic tenets of human anatomy, physiology, and biochemistry. These principles don’t change, no matter who you are. Dentists also have the perspective of getting treated by other dentists and treating their own families, and they know well that dental decay and gum diseases don't spare most of them, either.
Do Dentists Get to Keep Their Teeth into Retirement?
If you are curious to know about the dental health of dentists, here are some facts:
A comparative study in Kathmandu, Nepal, found that while the lifetime prevalence of dental caries was similarly high for both dentists and non-dentists (around 90%), dentists had far fewer untreated cavities and significantly better outcomes overall. On average, at the time of the study, dentists had 27.3 teeth remaining out of 32 natural teeth, compared to 25.4 teeth among a similar-aged non-dentist population [study link].
I couldn’t find a similar study from the United States, but I’d expect similar results for dentists and far worse for the general population. Americans live longer, consume more sugar, and eat a more damaging diet than the traditional one still common in most rural parts of Nepal.
As for gum disease (periodontitis), which is the leading cause of tooth loss, nearly half of all U.S. adults over 30 have some form of it [link]. Among dentists, by contrast, it’s virtually nonexistent in clinical studies. That’s not surprising: dentists are trained to spot its earliest signs and take action before it progresses.
One final and important point: the main cause of adult tooth loss isn’t cavities but gum disease. That’s why it’s so critical to start protecting your gums early, long before you hit your thirties. Judging by the dentists’ experiences everywhere, gum disease isn’t preordained but acquired out of ignorance, neglect, or both.
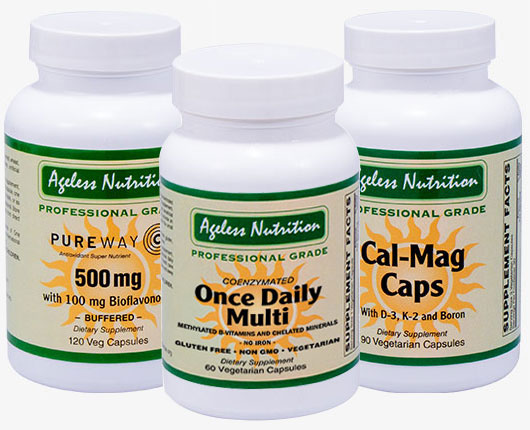
Core Supplements for Oral Health
Even with the most disciplined oral hygiene routine, your teeth and gums can only be as healthy as the tissues and metabolic processes that sustain them. This is where targeted nutrition comes in.
I recommend taking three basic supplements, pictured below. They include the Coenzymated Once Daily Multi formula that includes all required B-group vitamins, vitamins A, D-3, E, and K-2, trace elements in an easy-to-take capsule to assure complete breakdown and assimilation.
Coenzymated means the vitamins are provided in their active forms, identical to those used directly in human metabolism, so the body does not need to convert them before absorption and use.
The Multi formula doesn’t include Calcium and Magnesium or provide an optimal amount of vitamin C because they cannot fit into a single capsule. For this reason, I recommend taking them separately in forms optimized for safety (Buffered vitamin C) and for ease of assimilation in the case of Calcium and Magnesium.
Here is a brief description of the rationale and functions of each recommended supplement in the context of oral care protection:
Vitamin C supports collagen synthesis and capillary integrity. Low levels are linked to bleeding gums, poor healing, and increased periodontal inflammation.
Vitamin D-3 regulates calcium absorption and has a known role in immune modulation, affecting how your body handles inflammation and microbial threats in the oral cavity.
Vitamin K-2 directs calcium to bones and teeth rather than soft tissues and plays a protective role against tooth demineralization.
Magnesium is necessary for hundreds of enzymatic reactions, including those involved in bone and tissue repair. It’s often depleted in processed diets.
Calcium strengthens tooth enamel and jawbone, making teeth more resistant to decay and structural loss.
Trace elements such as zinc, copper, manganese, and iron support dental health by aiding collagen cross-linking in gums, promoting enamel remineralization, regulating the oral microbiome, and enhancing immune defenses against infection.
B-group vitamins play a key role in maintaining oral health, primarily through their impact on tissue repair, inflammation control, and nerve function. Here's a breakdown of the most relevant ones:
-
Vitamin B-2 (Riboflavin), B-3 (Niacin), and B-6 (Pyridoxine): Deficiencies can cause inflammation of the tongue (glossitis), cracked lips (cheilitis), mouth sores, and burning sensations in the mouth. These symptoms often appear before other systemic signs.
-
Vitamin B-9 (Folate) and B-12 (Cobalamin): Crucial for cell division and tissue repair. Deficiency may result in swollen, red, or bleeding gums, tongue inflammation, and even neurological symptoms like burning mouth syndrome. B12 deficiency is also linked to recurrent aphthous ulcers (canker sores).
-
Vitamin B-1 (Thiamine): Deficiency, though less common, may contribute to poor wound healing and increased susceptibility to oral infections due to impaired metabolism.
All three formulas are the same professional-grade products I take myself and recommend for maintaining and protecting not only teeth and gums but also overall health. If you are already taking a good-quality multivitamin, continue with it. Similar products are also available on Amazon and from other sources, usually at a higher cost.
Common Mistakes to Avoid:
-
Assuming diet alone is sufficient: Even well-balanced diets may fall short on D-3, K-2, or magnesium unless you’re intentionally addressing them.
-
Taking calcium without K-2: Without vitamin K-2, supplemental calcium may end up in soft tissues instead of being deposited in bone or teeth.
-
Inconsistent use: These nutrients work gradually. You may not notice changes for weeks, but cellular turnover in gums and dentin relies on a steady supply.
How to Use:
For detailed descriptions, ingredient lists, usage instructions, expected benefits, and potential side effects, please refer to the individual supplement listings in our catalog. Each entry is written with the same level of clarity and depth as this guide.
In Case You Have Chewing Difficulties
When teeth are missing, damaged, or replaced with poor-fitting dentures, food isn't chewed properly, forcing the stomach and intestines to handle what teeth failed to break down. This situation is especially problematic with protein-rich foods, because the byproducts of rotting proteins, such as putrescine and cadaverine, are highly toxic.
Incomplete digestion irritates the lining of the stomach and intestines. Over time, it leads to chronic heartburn, gastritis, duodenitis, and peptic ulcers. These problems are not caused by excess stomach acid, as many believe, but by undigested food remaining too long in the stomach.
Inflammation of the small intestine blocks nutrient absorption. Poor absorption, in turn, causes undernutrition that contributes to osteoporosis, arthritis, dementia, Parkinson's, and other degenerative disorders that begin with poor digestion.
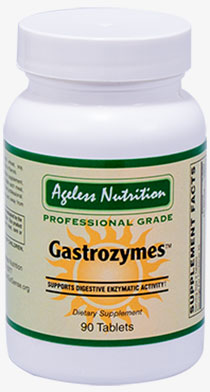
Antacid drugs make matters worse by suppressing gastric acid and natural enzymes. For people with dentures, bad teeth, or difficulty chewing, this creates a perfect storm of poor digestion and poor nutrition. A high-quality enzyme formula, such as Gastrozymes in our store, improves digestion and makes antacids unnecessary for most people.
There are many digestive enzyme products on the market, but most are weak, incomplete, or ineffective. Gastrozymes has been in continuous use for over 25 years by clients and family members with severe gastric disorders and with consistent results. This is one area where experimenting with unproven formulas is risky, and I do not recommend it.
How to Implement Proper Oral Hygiene
You must already have a good sense of the general state of your teeth and gums. But there’s one simple question that can be as revealing as a visit to the dentist:
Do you wake up with a bad taste in your mouth despite brushing and flossing before bed?
If the answer is yes, it may point to bacterial overgrowth in the oral cavity, gum disease, tooth decay, or all three because these conditions are usually connected.
Unlike adults, most healthy toddlers and preteens rarely experience this problem despite spotty brushing, no flossing, and eating and drinking dental time bombs throughout the day for the following reasons:
-
Intact tooth enamel that hasn’t yet thinned from years of acid exposure, grinding, excessive brushing, and dental treatments.
-
No gum recession, which limits root exposure to the pathogens, sugars, and acidity.
-
Tight periodontal pockets reduce bacterial colonization and contact of dentine with food.
-
Healthy salivary flow and less dry mouth, due to fewer medications and healthier hydration.
-
Nasal breathing helps maintain oral moisture and reduces mouth dryness (though mouth breathing is increasing, particularly in the U.S., due to allergies, air conditioning, excessive use of antibiotics, and other factors).
Even with poor oral hygiene, these physiological advantages offer temporary protection. But the damage tends to accumulate and become visible in adolescence or adulthood when those protective factors erode.
And that — bacterial overgrowth, gum disease, and tooth decay — are the first things you should eliminate because the more pathogenic bacteria you have in your mouth from all three, the greater the chance of developing all other conditions, regardless of how well you floss and brush your teeth, how often you visit the hygienist or have dental checkups.
It may also mean that you may have bad breath (halitosis) throughout the day that others can notice but not you. This particular problem may damage your career and relationships because coworkers, close friends, and even spouses may be reluctant to tell you about it.
The bad breath problem is a far more complex condition than what I mentioned above, and I’ll write more about it in future posts, but the technique below should take care of most of the cases.
In my case, when I wake up, I am not embarrassed to kiss my wife because my mouth tastes the same as it did before going to bed, and I am certainly not a teenager.
Tool #1. TheraBreath Toothpaste (Fresh Breath Toothpaste) +
I’ve been recommending this toothpaste only as a starting point, and will later move to two other brands that are less expensive and more effective in overcoming tooth sensitivity.
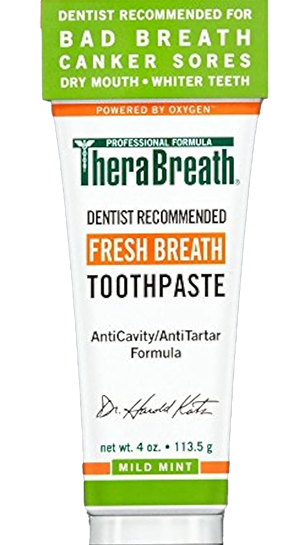
Rationale: TheraBreath toothpaste is formulated to combat oral bacteria and maintain a healthy oral environment. It contains sodium chlorite (OXYD-8), an oxygenating compound that targets the anaerobic bacteria responsible for bad breath by oxidizing their foul-smelling sulfur byproducts. This helps neutralize volatile sulfur compounds and reduce halitosis.
The formula is pH-balanced and contains baking soda (sodium bicarbonate), which can assist in neutralizing acids.
Unlike many conventional toothpastes, TheraBreath is free of sodium lauryl sulfate (SLS) and artificial additives. SLS is a detergent found in many toothpastes that can dry out or irritate the mouth; in people prone to canker sores (aphthous ulcers), using an SLS-free toothpaste has been shown to reduce the frequency and pain of ulcers.
By omitting SLS and alcohol, TheraBreath is gentler on the oral mucosa and helps maintain moisture (important for saliva’s protective functions). The active oxygenating ingredient (stabilized chlorine dioxide from sodium chlorite) is effective at reducing bacteria trapped in the tongue folds and periodontal pockets without the side effects associated with stronger antiseptics.
Chlorine dioxide selectively neutralizes odor-causing compounds and bacteria but does not significantly interact with healthy tissue.
TheraBreath includes tetra-potassium pyrophosphate. This ingredient helps to bind calcium in saliva, which can reduce tartar buildup (calculus) on teeth over time.
Together, these ingredients make TheraBreath effective in controlling oral bacteria (for both breath and plaque) while being safe for daily use, even for those with sensitive gums or dry mouth.
How and When to Use: Use TheraBreath toothpaste as your primary toothpaste twice daily (morning and bedtime) or after meals, just as you would any standard toothpaste.
Apply a pea-sized amount of toothpaste to an ultra-soft toothbrush (see later). Brush all tooth surfaces gently for about 2 minutes, ensuring you reach the gumline and crevices. Spit out the excess foam, but avoid vigorous rinsing with water immediately after brushing to allow the fluoride and oxygenating compounds to continue working for extended benefit.
This step is even more critical to eliminate bad breath. Brush the tongue with the Radius brush (see below) to remove odor-causing bacteria trapped in the tongue folds. It’s especially effective to brush before bed so that protective ingredients remain in the mouth overnight when saliva flow is low.
If morning breath is a concern, using it right after waking will help oxidize any sulfur compounds produced overnight.
Common mistakes to avoid:
-
Rinsing Immediately: Rinsing with water right after brushing can wash away the fluoride and antibacterial ingredients. Instead, spit out excess toothpaste and let the residue remain on teeth for extra protection.
-
Using Too Little or Skipping Night Brushing: Inadequate use (e.g., a tiny dab or irregular brushing) may not deliver enough active ingredients to be effective. Use a sufficient amount and brush nightly, since plaque and bacteria accumulate over the day, and fluoride works best with consistent exposure.
-
Expecting Instant Results for bad breath: If using TheraBreath for chronic bad breath, give it some time. Don’t expect one quick brushing to cure bad breath permanently. While it will rapidly neutralize odors, consistent use is needed to alter the oral bacterial balance.
-
Neglecting the Gumline: Brushing only the tooth crowns and forgetting the gum margin can leave plaque behind. Angle your brush at 45° to the gums to gently clean that area. TheraBreath’s gentle foaming action (without SLS) will help reach these areas without irritating gum tissue.
-
Contaminating or Storing Improperly: As with any toothpaste, don’t share your tube with others in a way that contacts the nozzle with a used toothbrush, to avoid cross-contamination. Also, keep the cap closed to maintain the stability of the oxygenating ingredients.
By using it correctly, TheraBreath can significantly improve oral hygiene and breath freshness safely.
Tool #2. Radius Toothbrush for Tongue Brushing +
The tongue harbors a significant amount of oral bacteria and debris, which can contribute to bad breath and impact dental health. In fact, an estimated 50% of cases of halitosis are caused by residues on the tongue surface.
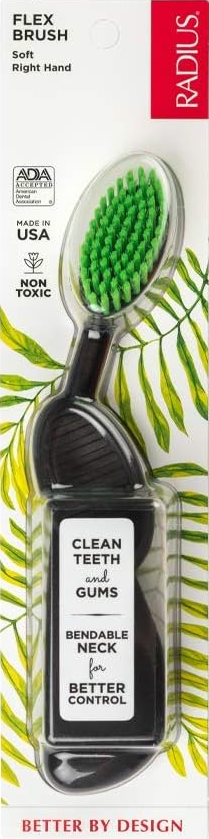
The tongue’s rough surface (covered in papillae) can trap food particles, dead cells, and bacteria, forming a coated layer that produces foul odors as bacteria release volatile sulfur compounds. Regularly cleaning the tongue disrupts this bacterial habitat and removes the odor-causing film.
Using a Radius toothbrush for tongue brushing leverages its wide bristle head and soft, radiating bristles to sweep the tongue’s surface effectively. The large oval head of the Radius brush covers more area of the tongue in one pass compared to a standard narrow toothbrush, helping to dislodge more bacteria and debris with each stroke.
Additionally, the soft, vegetable-derived bristles are gentle on the tongue’s delicate tissues, reducing the risk of soreness or abrasion while still clearing the coating. By brushing the tongue, you not only improve breath but also potentially reduce the bacterial load in the mouth, which can lower the risk of plaque buildup on teeth and gum inflammation (since the tongue can serve as a reservoir for periodontal bacteria).
Why It’s Effective/Safer Than Alternatives: While specialized tongue scrapers are available and are very effective (they can remove about 75% of volatile sulfur compounds vs. ~45% with a toothbrush), using a toothbrush like the Radius has its advantages.
First, it’s convenient – you can use the same tool you brush your teeth with (or a dedicated Radius brush) also to clean your tongue, integrating the habit into your normal routine. The Radius brush’s design – a broad, ergonomic handle and big head – makes it easy to reach the back of the tongue and apply even pressure without gagging as much, which some people find difficult with smaller scrapers. Its soft bristles are safer than improvised methods (like using a hard spoon or aggressive scraper) because they won’t cut or irritate the tongue surface if used gently.
The brush can both brush and lightly scrub the tongue, effectively removing the top layer of the tongue coating. Many users report that a wide, soft brush like the Radius not only cleans well but also feels more comfortable than plastic tongue scrapers that may have hard edges. Furthermore, the Radius toothbrush is ADA-approved for efficacy and safety, meaning it meets standards for gentle use in the mouth. By comparison, using a regular narrow toothbrush to clean the tongue can be less efficient (covering a smaller area) and might induce more gag reflex if you need to move it around more.
The Radius brush, with its unique oversized head, reduces the risk of over-scrubbing a single spot—its even bristle spread helps distribute pressure. Overall, it provides an effective tongue cleaning while being as safe on the soft tissues as a normal brushing.
How and When to Use for Best Results
It’s best to brush your tongue at least twice per day, ideally during your morning and nighttime oral hygiene routine and before brushing your teeth.
After brushing your teeth, extend your tongue and place the Radius brush toward the back of the tongue, as far as comfortable (be careful to avoid triggering a strong gag reflex).
Using light pressure, brush from the back toward the tip of the tongue in one sweeping motion. You may see a film or debris collected on the bristles – rinse the brush off thoroughly after each pass.
Repeat this motion 2–3 times, covering the entire top surface of the tongue. Make sure to also gently brush the sides of the tongue, as bacteria can reside there, too. While brushing, breathe through your nose (this helps avoid gagging). After brushing the tongue, rinse your mouth with water to flush away the dislodged debris.
After each few passes, pull the brush out of your mouth and smell it before rinsing. This is how you determine if you have halitosis and whether the tongue has been cleaned effectively. This step is the most critical part of the process.
Timing: For freshest breath, tongue-brush in the morning (since odor-causing buildup accumulates overnight) and before social occasions. If you have eaten foods that leave a residue (e.g., milk products or coffee) or if you suffer from dry mouth, an extra tongue brushing mid-day can help. Some people like to dedicate a separate Radius brush just for tongue cleaning, which is fine – if so, rinse it well and store it upright to dry. Incorporating tongue cleaning into your routine will only add a minute or two, but can noticeably improve breath freshness.
Common Mistakes to Avoid:
-
Scrubbing Too Hard: The tongue’s surface can be abraded or irritated if you brush it aggressively. Use gentle pressure – you’re aiming to wipe off the film, not scrub the tongue raw. If your tongue feels sore or bleeds, ease up on the force. Over-brushing can also inflame taste buds.
-
Not Brushing Far Enough Back: Most of the odor-producing bacteria reside on the back of the tongue, where it’s darker and moister. A common mistake is only brushing the front half of the tongue, which is easy to reach. Try to reach a bit further back (without gagging) because cleaning only the front will miss the problem area. Using a Radius brush’s longer reach can help, but do it gradually if you’re sensitive – you can desensitize your gag reflex over time.
-
Inconsistent Routine: Tongue brushing once in a while (or only before a dentist visit) won’t yield sustained benefits. The coating and bacteria will rebuild in a day or two. Make it a regular habit. Skipping tongue cleaning when you brush your teeth is a missed opportunity to reduce microbial load and bad breath significantly.
-
Using a Brush in Poor Condition: If the Radius brush bristles are splayed or worn out, they will be less effective and can become a breeding ground for bacteria themselves. Replace your brush (or brush head) every few months. A frayed brush won’t clean well and might even irritate the tongue more. Also, always rinse the brush after tongue cleaning — do not just cap it immediately with debris on it.
-
Forgetting Other Halitosis Factors: Don’t assume that tongue brushing alone will cure all bad breath. It’s a key component, but also continue proper tooth brushing, flossing, and hydration. If bad breath persists despite a clean tongue, consider if sinus issues or diet might be contributors. That said, a clean tongue via the Radius brush will remove one of the biggest sources of oral odor and contribute to overall oral health.
Tool #3. Oral-B Glide Pro-Health Comfort Floss +
Rationale: Dental flossing is essential for removing plaque and food particles from the tight spaces between teeth and just below the gumline – areas that a toothbrush cannot adequately reach.

If left in place, bacteria in these areas form plaque and produce acids and toxins that can cause interdental cavities (tooth decay) and gingivitis (gum inflammation)
Glide Pro-Health Comfort Floss is a type of floss made from a single filament of polytetrafluoroethylene (PTFE), which gives it a very smooth, shred-resistant texture. The physiological rationale for using this floss is to disrupt the interdental plaque biofilm daily, thereby preventing it from maturing and calcifying.
By flossing with Glide, you physically sweep away bacteria-laden plaque and any trapped food debris, which protects gums from inflammation and lowers the risk of gum disease progression (gingivitis can advance to periodontitis if plaque hardens into tartar).
Regular flossing also helps prevent malodor, since food debris stuck between teeth can rot and cause bad breath. Using floss like Glide stimulates the gum tissue gently, improving blood circulation to the gums. Over time, consistent flossing can toughen the gums, making them healthier and less prone to bleeding.
Why Glide Comfort Floss Is More Effective/Safer: Glide’s defining feature is its ultra-smooth, “gliding” PTFE fiber, which allows it to slip easily into tight interdental spaces with minimal friction. This makes it especially effective for people with very tight contacts between teeth or rough edges that usually snag or shred regular floss. Because it doesn’t fray or break easily,
Glide can clean the entire length of the interdental space in one piece, capturing plaque throughout without leaving behind fibers. Importantly, its comfort also translates to better compliance and technique: in a clinical study, about 75% of participants preferred PTFE floss over traditional nylon floss, meaning they were more likely to use it regularly and properly. The same study noted that the PTFE floss group had a greater reduction in gum bleeding after two weeks of use compared to those using standard waxed floss (56% vs 39% reduction in bleeding sites).
This indicates that Glide floss’s gentler action cause less trauma to the gums while still removing plaque, leading to faster improvement in gum health. Traditional multifilament floss can sometimes cut into the gums if snapped too hard or fray and get stuck, which may discourage users. Glide’s monofilament design is softer on the fingers and gums, reducing the risk of the floss “sawing” into gum tissue.
It’s also marketed as “Comfort” floss because it doesn’t tend to painfully snap down or require a lot of force to get between teeth – this can make flossing a less daunting task, especially for those new to flossing or with sensitive gums.
How and When to Use: Use Oral-B Glide floss once a day, ideally before brushing at night or whenever you have a large meal that leaves residue. Flossing before brushing can dislodge plaque and food, allowing the subsequent toothbrushing and rinsing to remove those particles thoroughly. To floss correctly with Glide Comfort Floss:
-
Prepare a Length: Break off about 18 inches (45 cm) of floss. Wind the ends around your middle fingers, leaving 2–3 inches of taut floss between them. You can adjust the length between fingers to a comfortable span for your mouth.
-
Guide Between Teeth: Using your index fingers and thumbs to control the floss, gently slide the floss between two teeth using a back-and-forth motion. Glide’s smooth texture should make this insertion easy without sudden snapping. Be careful not to snap the floss directly onto your gum – insert it gradually.
-
Curvature Technique: When the floss reaches the gumline, curve it into a “C” shape against one tooth. This means wrapping the floss around the side of one tooth, so it hugs the tooth surface.
-
Gently slide the floss up and down against that tooth, going slightly below the gumline (to reach the sulcus). You might feel resistance or a slight squeak as plaque is removed – that’s a good sign. Do not press so hard that you hurt the gum; a gentle pressure is enough to scrape off plaque.
-
Pull the floss out of your mouth and smell it. This is the most critical step. If you detect a bad odor, that spot likely harbors an infected pocket, decaying root, trapped bacteria, or food debris. Unwind a clean segment of floss and go back in until the smell is gone. Over time, you’ll learn which areas need extra attention and won’t have to check every tooth. But at the beginning, this step is non-negotiable. If the smell persists despite flossing, it’s time to see a dentist.
-
Repeat on Adjacent Tooth: Still in the same interdental space, curve the floss around the neighboring tooth and repeat the up-and-down motion under the gum. Each space requires cleaning of both tooth surfaces.
-
Use a Fresh Section: As you move from space to space, unwind a clean segment of floss from one hand and take up the used floss with the other hand. This ensures you’re not just transferring plaque to the next area. With Glide floss, you’ll notice it doesn’t shred, but it’s still good practice to use a fresh portion so you have full thickness and a new cleaning surface for each gap.
-
Work Through All Teeth: Don’t forget the very back teeth. Maneuver the floss to reach the backside of the last molars – a spot often missed – using the same C-shape motion. You may need a longer piece of floss between fingers to reach back there. A holder or floss pick can help for hard-to-reach spots, but ensure it’s taut and use the same technique.
-
Finish Up: After flossing every gap, rinse your mouth to wash away the loosened debris. Then, proceed to brush your teeth as normal (with fluoride toothpaste). Consistency is key: floss daily; your gums might be a little tender or bleed initially if you’re new to flossing, but with regular practice, they will become healthier, and bleeding should stop as inflammation reduces.
Common Mistakes to Avoid:
-
“Snapping” or Forcing the Floss: A common error is to jam the floss down quickly between teeth, which can cut or traumatize the gum papilla. With Glide’s slick floss, use a controlled motion; if you find yourself snapping it, slow down and use a gentle sawing motion to ease it through tight contacts.
-
Not Hugging the Tooth: Simply popping the floss in and out of each gap without rubbing up and down the tooth surfaces won’t remove much plaque. Avoid just a quick vertical in-and-out. Instead, always curve and rub the floss against each tooth. Imagine scraping plaque off the side of a tooth – that’s the goal.
-
Flossing Too Aggressively or Too Often: While daily flossing is beneficial, flossing more than once a day aggressively can damage gum tissue. Gums need time to heal and adjust. Also, do not “saw” back and forth horizontally at the gumline – this can cut into the gums. The motion should be vertical (up-down), not a harsh side-to-side saw.
-
Stopping When Gums Bleed: If your gums bleed when flossing, it’s usually a sign of inflammation from plaque buildup. Many people mistakenly stop flossing those areas out of fear. In reality, gentle, persistent flossing will help reduce bleeding over time as the gums get healthier. If you use Glide floss correctly, the bleeding should lessen within a week or two. If a particular spot continues to bleed after a couple of weeks of consistent flossing, have a dentist check it – there could be a deeper issue.
-
Missing Some Teeth: Be thorough – sometimes people floss the front teeth and neglect the back teeth or the very tight spots. Each tooth (except perhaps the last molars’ outer sides) has two sides to floss. Don’t skip because it’s awkward; Glide’s comfort design is meant to help reach even tough spots. Using a floss aid (like floss holders or threaders for bridges/braces) can ensure no area is skipped.
-
Reusing the Same Section of Floss: Using one little bit of floss for the whole mouth can just spread bacteria around. Glide floss is strong, so it might look clean, but once plaque is on it, move to a new section. Discard the floss after use – it’s single-use. Also, if the floss ever shreds or frays (rare with Glide), replace it immediately to avoid leaving fibers wedged between teeth. By mastering gentle, correct technique with a comfortable floss like Glide, you’ll significantly improve your gum health and prevent long-term dental problems.
Tool #4. NeilMed Sinus Nasal Irrigation Kit +
The nasal passages and sinuses are closely connected to the mouth through the pharynx. While they’re anatomically distinct, discharge from the nose and sinuses often drains toward the throat and can affect the microbial environment of the mouth. So, even with excellent oral hygiene, unresolved nasal or sinus infections may continue to reintroduce pathogens into the oral cavity, contributing to bad breath, inflammation, or delayed healing.
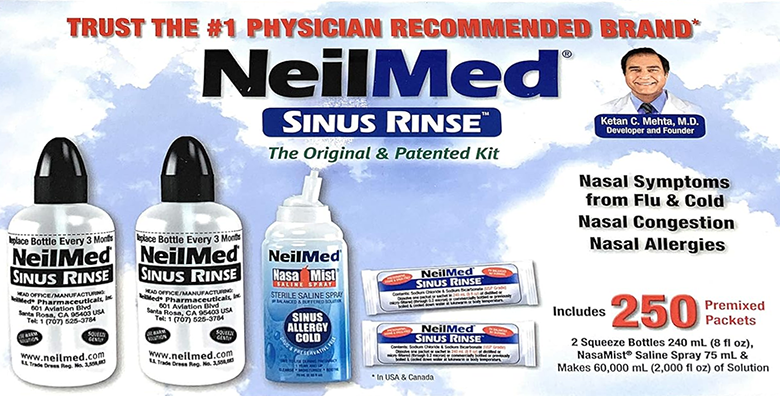
Rationale: The NeilMed Sinus Rinse Kit is a saline nasal irrigation system that flushes out the nasal passages and sinuses with salt water.
This might seem indirectly related to teeth and gums, but consider the connections: chronic nasal congestion or allergies can lead to mouth-breathing, which dries out the mouth. A dry mouth means less saliva, and saliva is critical for neutralizing acids and bacteria.
When the mouth dries, it becomes a more hospitable environment for harmful bacteria, often leading to bad breath and a higher risk of having cavities and gum disease. Mouth-breathing at night, for example, can contribute to gingival inflammation and increased plaque because the gums dry out and plaque isn’t flushed by saliva.
By using a sinus rinse to keep your nasal airways clear, you encourage more nasal breathing, which helps keep the oral cavity moist and protected. Another rationale is the link between sinus issues and halitosis (bad breath).
Post-nasal drip (mucus draining from the sinuses into the throat) coats the back of the tongue and throat with proteins that oral bacteria can decompose, producing odors.
It’s noted that persistent bad breath often results from post-nasal drip, and clearing the sinuses can alleviate that. Saline rinsing physically removes excess mucus, bacteria, and allergens from the nose and sinuses, which can reduce the frequency of sinus infections and throat irritation.
Less sinus inflammation means fewer secretions that spread smelly bacteria in the oral and pharyngeal area. Additionally, improved sinus health can indirectly reduce the risk of dental pain – sometimes, congested sinuses create pain in the upper teeth or put pressure that can be mistaken for a toothache.
You can easily tell if your sinuses are congested, inflamed, or both by bending your head forward and noting any pain or pressure in the forehead area. The pain or pressure you feel in your forehead when bending your head forward is caused by fluid buildup and inflammation in your frontal sinuses.
When you're upright, gravity helps drain the sinuses. But when you tilt your head down, fluid shifts and increases pressure inside the inflamed sinus cavities, pressing against surrounding nerves and tissues. This causes a dull ache or sharp pain—especially if the sinus openings are partially blocked due to swelling, mucus, or infection. It's a common sign of sinusitis or allergic inflammation.
Frontal sinusitis, also known as frontitis, is a specific type of sinus infection that affects the frontal sinuses located behind the forehead. It falls under the broader umbrella of sinusitis, which refers to inflammation in any of the four major sinus groups: maxillary (cheeks), frontal (forehead), ethmoid (between the eyes), and sphenoid (deep behind the eyes).
A sinus rinse with a squeeze bottle reliably flushes the maxillary and anterior ethmoid sinuses, with only limited effect on the frontal and sphenoid sinuses unless specific techniques or medical devices are used.
Overall, the sinus rinse promotes better breathing and less bacterial overload dripping into the oral cavity, thereby supporting fresher breath and a healthier oral environment.
Why It’s Effective/Safer Than Alternatives: NeilMed Sinus Rinse is a drug-free, isotonic saline solution – essentially salt water at the proper concentration – so it’s a natural method with minimal side effects.
Compared to relying on nasal decongestant sprays or medications, saline rinsing can be used daily without the risk of rebound congestion or systemic effects. (For example, decongestant sprays used more than a few days can cause the nasal lining to swell back worse – saline doesn’t have this problem.) It’s more effective than just saline nasal sprays because the squeeze-bottle irrigation floods the sinus passages with volume, reaching deeper and flushing out thick mucus, dust, and pollen.
Clinical guidance often recommends nasal irrigation for sinusitis and allergy relief: it’s proven to help relieve congestion and sinus pressure by clearing clogged passages. By regularly using the rinse, allergy sufferers can remove allergens from their nose, potentially reducing mouth-breathing at night due to congestion. It’s also an effective way to reduce post-nasal drip; when you rinse, you wash away the mucus that would otherwise trickle down your throat. ENT specialists note that restoring normal nasal flow through irrigation can significantly improve chronic bad breath caused by sinus issues.
Safety-wise, the NeilMed system (when used correctly) is very safe: it uses a buffered saline packet that, when mixed with water, matches the body’s natural salinity, so it doesn’t burn or irritate the nasal tissues. This buffered salt solution is gentler than plain water, which would cause swelling or stinging.
Unlike some home remedies, the kit ensures the right salt concentration and purity (medical-grade salt and baking soda) for safety. It’s also superior to just gargling or throat sprays for post-nasal drip because it addresses the source by cleaning the sinuses. In short, sinus irrigation is a mechanical cleanse – it’s effective in reducing microbial and allergen load in the nasal cavity, and it’s as safe as washing your nose with sterile saline.
Just as we brush and floss to remove plaque mechanically, we rinse the sinuses to remove irritants and bacteria, improving oral breathing conditions without drugs.
How and When to Use: The sinus rinse is best used daily or as needed when you experience congestion, post-nasal drip, or during allergy season. Many users find rinsing once in the evening helps them breathe better overnight (improving oral moisture during sleep), and others also rinse in the morning to clear any overnight buildup. To use the NeilMed Sinus Rinse correctly, follow these steps:
-
Prepare the Solution: Start with distilled or boiled water (that has cooled to lukewarm) – about 8 ounces (240 mL) to fill the NeilMed squeeze bottle. Using safe, sterile water is critical; never use tap water unless it’s been boiled, as tap water can contain microorganisms unsafe for the nasal passage.
-
Empty one NeilMed saline powder packet into the bottle. Cap and shake the bottle gently until the powder fully dissolves, creating a buffered saline solution. The water should be comfortably warm (body temperature); cold water can be uncomfortable and even lead to headaches, while too hot water can burn.
-
Position Yourself: Stand over a sink and lean forward slightly. It helps to do this over a basin or in the shower. Keep your head tilted down (so the solution doesn’t run down your throat) and turn your head a little to the side – about 45 degrees – so that one nostril is above the other. Breathe normally through your mouth (important: keep your mouth open to avoid pressure buildup).
-
Irrigate One Side: Gently place the nozzle of the bottle snugly against the upper nostril. Squeeze the bottle gently but steadily, sending the saline into that nostril. The fluid will flow up into the nasal cavity and sinus and then come out through the other nostril (the lower one), carrying mucus and debris with it. You’ll feel a warm flush through your nose; it shouldn’t hurt. Use about half the bottle for this first side (4 oz or so). While squeezing, do not swallow or block your nose – just keep breathing through the mouth. This avoids pressure that might send fluid toward the ears. If you feel fluid dripping into your throat, that’s okay – just spit it out.
-
Clear and Repeat: After finishing one side, gently blow your nose to clear any remaining solution and mucus (don’t pinch hard or blow forcefully, as the nasal tissues are soft after rinsing; just a light blow with one nostril closed at a time). Then tilt your head to the opposite side and repeat the process for the other nostril with the remaining solution. Squeeze the bottle until it’s empty or you’ve used an equal volume on the second side.
-
Drain and Dry: Once both sides are rinsed, bend forward and turn your head side to side to let any residual saline drain out. You might also sniff in gently once or twice to help clear the back of the nasal passages, then spit out through your mouth anything that reaches the throat. Again, blow your nose gently. It’s normal for a little saline to drip out over the next few minutes, so keep a tissue handy. Try not to rinse right before bed or leave the house without giving it a few minutes to drain fully.
-
Clean up after use: Thoroughly clean the bottle and nozzle after each use. Rinse them with distilled or boiled water and a bit of dish soap, then air dry. (Many kits come with instructions for cleaning – follow those. Often, you can also periodically disinfect the bottle with a vinegar or bleach solution as directed by the manufacturer.) Do not just top up and reuse the bottle without cleaning; since it contacts nasal secretions, you want to prevent bacteria or mold from growing in it between uses. Replace the bottle every few months, similar to a toothbrush, because plastic can develop biofilm over time.
For best results, integrate the sinus rinse into times when you brush your teeth at night or morning. This pairing ensures you address both nasal and oral hygiene. During high-allergen times (spring pollen, etc.) or if you have a cold, you might rinse twice a day (morning and night).
If your nose is very clogged, you can breathe steam or use a decongestant spray 5-10 minutes before the rinse to open things up, then use the saline to flush everything out. Many people experience immediate, easier breathing and find that they no longer wake up with a dry mouth or sore throat.
Common Mistakes to Avoid:
-
Using Tap Water or Contaminated Water: Perhaps the most crucial safety point – always use distilled, sterilized, or previously boiled water for the rinse. Tap water can contain microbes (like amoebae or bacteria) that are safe to drink (stomach acid kills them), but can infect the nasal passages and even cause serious brain infections. This is rare but real. Boiling tap water for 3-5 minutes and cooling it is an easy way to make it safe. Never use straight tap or filtered water that isn’t sterile.
-
Incorrect Saline Mixture: Don’t use plain water without the salt packet, and don’t improvise with table salt. Plain water will cause a burning sensation and make the nasal tissues swell (due to osmotic imbalance). The NeilMed packets have the right proportion of salt and baking soda to match your body’s fluids. Similarly, avoid overly strong solutions – more salt is not better and can dry out or irritate the lining. Stick to the provided formula unless a doctor directs a different concentration (e.g., hypertonic for severe congestion).
-
Forgetting to Keep Mouth Open or Blowing Too Hard: If you close your mouth or hold your breath during the rinse, pressure can build and potentially push fluid into the Eustachian tubes of your ears, causing discomfort or infection. Always breathe through the mouth while rinsing. Likewise, after rinsing, don’t pinch your nose and blow forcefully – this too can force saline into your ear canals. Gentle nose-blowing and letting gravity drain the solution will suffice. If you experience ear pain, you may have been blowing too hard or have an existing ear issue – pause and consult a doctor.
-
Overuse/Irrigation Addiction: While nasal irrigation can be done daily, using it excessively (several times a day for no medical reason, for months on end) might strip away some of the natural mucus that has beneficial immune functions. Overuse can lead to nasal dryness or irritation of the mucosa. Using it once or twice daily as needed is fine; just avoid numerous back-to-back rinses or continuing very frequent use if symptoms have resolved, as it could inflame the nasal lining.
-
Poor Hygiene of the Device: A common mistake is treating the sinus rinse bottle like a forever reusable item without cleaning it. The warm, moist environment of a used rinse bottle can grow bacteria or mold, which you do not want to squirt into your nose next time. Always wash the bottle and nozzle promptly after each use and let them dry completely. Do not assume the bottle is clean because it only ever had saline in it – it also had your mucus passing through. Also, don’t put the bottle in the dishwasher unless the manufacturer says it’s dishwasher-safe, and you still check that all internal surfaces get cleaned (often dishwashers can’t reach inside the narrow bottle effectively ). Regularly inspect and replace the kit (every 3 months or so, or as directed).
-
Using It With Certain Conditions Without Medical Advice: If you have had recent ear surgery or currently have an ear infection, flushing the sinuses could potentially aggravate it. In such cases, consult a doctor first. Similarly, young children shouldn’t use an adult sinus rinse kit unsupervised (and children under ~2 shouldn’t use it at all unless a pediatrician specifically instructs). In normal scenarios, the sinus rinse is very safe, but always listen to your body – slight stinging or ear popping means you should adjust your technique or temperature.
When used properly, NeilMed sinus rinsing can become a simple, effective adjunct to
oral care – by ensuring you can breathe through your nose and reducing drip into your mouth, it helps
protect your teeth and gums in the long run.
Tool #5. Sensodyne Toothpaste for Sensitive Teeth +
Rationale: Tooth sensitivity (dentin hypersensitivity) occurs when the protective enamel layer of teeth or the gum coverage over tooth roots has worn away, exposing tiny tubules in the dentin that lead to nerve endings.
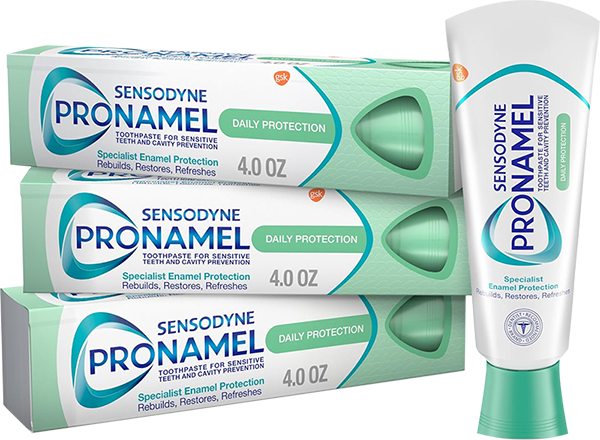
Triggers like cold water, sweet or acidic foods, or even brushing can cause fluid movements in these dentin tubules that stimulate the nerves, resulting in sharp pain. Sensodyne is a toothpaste specifically formulated to address this by targeting the nerve response and reinforcing the exposed areas.
Many Sensodyne variants contain potassium nitrate (5%) as the active desensitizing ingredient. The physiological rationale is that potassium ions penetrate the dentin tubules and accumulate around the nerve fibers, which reduces nerve excitability. Essentially, the elevated extracellular potassium prevents the nerve from firing pain signals as readily by interfering with the polarization mechanism.
Over a couple of weeks of daily use, this leads to a lasting reduction in sensitivity – the nerves become calmer and less reactive to stimuli. Other Sensodyne types use stannous fluoride (0.454%) or similar compounds (like strontium salts or calcium phosphate technologies) that work by occluding the dentin tubules.
For example, stannous fluoride helps form a plug or a protective mineral layer over the exposed dentin, thereby blocking the tubules so stimuli can’t reach the nerve as easily. Both approaches (nerve calming and tubule blocking) ultimately reduce the pain from sensitive teeth. Sensodyne also includes fluoride (typically sodium fluoride) for cavity prevention, which is important because exposed dentin (on root surfaces or worn enamel areas) is more vulnerable to decay.
By strengthening these areas with fluoride, Sensodyne helps prevent further damage that could worsen sensitivity. In summary, the use of Sensodyne toothpaste addresses sensitivity at a physiological level – either by chemically numbing the nerve response or by shielding the exposed channels – while still cleaning the teeth and guarding against cavities.
Why It’s More Effective/Safer Than Alternatives: Sensodyne is one of the most widely recommended toothpastes by dental professionals for sensitive teeth because it has a proven track record and clinical evidence supporting its efficacy. The key advantage over regular toothpaste is the inclusion of a dedicated desensitizing agent (like potassium nitrate or stannous fluoride) in a significant concentration.
Regular toothpastes lack these and may even aggravate sensitivity if they have high abrasivity or strong flavoring agents. Sensodyne, on the other hand, is typically formulated to be low-abrasive, meaning it cleans without excessive wear on already thin enamel.
This makes it safer for long-term use on sensitive teeth or people with enamel erosion. In fact, Sensodyne’s “Pronamel” line is designed to help re-harden acid-softened enamel, protecting against acid erosion – an added benefit since acid erosion and sensitivity often go hand in hand. In terms of effectiveness, studies over decades have shown that toothpastes containing potassium nitrate significantly reduce dentin hypersensitivity after a few weeks of use compared to a placebo.
One reason Sensodyne is more effective than ad-hoc home remedies is the sustained delivery of desensitizing ingredients. By brushing twice daily with it, you constantly bathe the sensitive areas in potassium or stannous ions, which gradually build a protective effect. Home remedies like clove oil (which numbs temporarily) or saltwater rinses don’t provide that ongoing barrier or neural stabilization.
Sensodyne is also safer than simply “avoiding cold foods” (a common coping strategy) because it addresses the problem without compromising diet or nutrition. Importantly, using Sensodyne allows individuals to continue cleaning their teeth properly despite discomfort. Without a sensitive-teeth toothpaste, some people may avoid brushing the sensitive areas, which can lead to plaque buildup, gum disease, or decay.
Sensodyne alleviates pain enough that you can maintain good oral hygiene – this is a critical safety aspect, as neglecting brushing is harmful. Compared to more invasive treatments (like fluoride varnishes or dental bonding agents applied by dentists to cover exposed dentin), Sensodyne is a conservative at-home measure. It’s non-invasive and has no real side effects (aside from the normal risk if swallowed in large amounts due to fluoride).
Potassium nitrate is safe in toothpaste concentrations, and stannous fluoride not only helps with sensitivity but also has additional anti-cavity and anti-gingivitis benefits. In fact, stannous fluoride toothpastes can reduce gum inflammation and plaque, giving a two-fold protection.
Overall, Sensodyne’s effectiveness comes from scientifically backed ingredients that provide relief within weeks, and its safety comes from a gentle formulation that avoids irritants, making it suitable for long-term daily use to manage chronic sensitivity.
How and When to Use: Use Sensodyne just like a regular toothpaste, twice daily, for at least two minutes each session. Consistency is crucial – to build up the protective effects, it should be the only toothpaste you use (or at least the primary one). Here are some tips for best use:
-
Brushing Technique: Apply a 1-inch strip (or a pea-sized amount if using a concentrated version) of Sensodyne on a soft-bristled toothbrush. Brush all your teeth gently, using circular or short back-and-forth strokes. Pay special attention to the sensitive areas (often near the gumline of certain teeth); don’t avoid them, but also don’t scrub hard – let the toothpaste do the work. The goal is to deliver the active ingredients to those areas.
-
Duration and Frequency: Brush twice a day, ideally morning after breakfast and at night before bed. Nighttime is particularly important: after brushing, do not eat or drink anything (except water) so that a residue of the toothpaste remains on the teeth while you sleep. Many dentists suggest not rinsing your mouth with water after spitting out the toothpaste, to leave a little coating for a prolonged effect. If you feel you must rinse, use just a tiny sip of water or a fluoride mouthwash.
-
Special Application for Severe Sensitivity: For teeth that are extremely sensitive (for example, if you have a specific exposed root), you can do a spot application: after your regular brushing, take a dab of Sensodyne on your fingertip or a cotton swab and gently rub it onto the sensitive tooth surface. Leave it on for a few minutes (spit out any excess saliva). This can provide an extra localized benefit. Many users do this at bedtime so the paste remains in contact with the tooth longer.
-
Give it Time: Sensodyne is not an instant anesthetic; it generally takes about 2 weeks of twice-daily use to reduce sensitivity, as the nerve hyper-excitability diminishes noticeably. So continue using it even if you don’t see results in the first few days. Mark your calendar to check in two weeks – you should find you can tolerate colder or sweeter foods better. With some formulations (like those with stannous fluoride), some people report improvement in just a few days, but results vary.
-
Ongoing Use: For lasting protection, make Sensodyne your long-term toothpaste. If you stop using it, the sensitivity can return after some time because the protective effects will subside. There is no harm in using it indefinitely – it also works as a normal fluoride toothpaste to prevent cavities. You can also alternate between Sensodyne and another fluoride toothpaste if instructed, but usually using it exclusively yields the best relief.
-
When to Use Caution: After using Sensodyne, avoid immediately consuming very acidic foods or drinks (orange juice, soda). While Sensodyne helps with sensitivity, acids can still quickly soften exposed dentin. It’s good practice to wait a bit or rinse your mouth with water if you’re about to have something acidic. Also, do not exceed the instructed use (e.g., do not brush 5–6 times a day with it), thinking more will cure sensitivity faster – overbrushing can cause abrasion. Stick to morning and night, and be gentle.
Common Mistakes to Avoid:
-
Expecting Instant or Permanent Cure: A frequent mistake is using Sensodyne for a day or two, not feeling complete relief, and giving up. Sensitivity relief is gradual. Give it a fair trial for a few weeks. Conversely, don’t assume that once your teeth feel better, you can stop using it. If the underlying causes (gum recession, enamel wear) are still present, discontinuing the toothpaste may allow sensitivity to return. Think of it as managing a chronic condition – consistent use is key to keeping sensitivity at bay.
-
Using Abrasive Whitening Products Alongside: Using Sensodyne, but then occasionally using a harsh whitening toothpaste or powder (which is often highly abrasive or contains peroxide that can irritate the nerve) can sabotage the protective effects. Abrasive products can remove the plug over dentin tubules or counteract the gentle approach.
-
Rinsing or Diluting Too Much: As mentioned, avoid rinsing out all the toothpaste right after brushing. Also, do not wet your toothbrush too much or run water over the toothpaste – you don’t want to dilute the concentration of potassium nitrate or fluoride while brushing. A slight dampening of the brush is fine, but a dripping wet brush is not ideal. Let the paste stay concentrated on those sensitive spots.
-
Inconsistent Brushing Habits: Relying on Sensodyne alone while neglecting good brushing/flossing habits is a mistake. If plaque accumulates, it can cause gum inflammation and recession, exposing more dentin, which leads to more sensitivity (a vicious cycle). Use Sensodyne as part of a comprehensive routine: gentle brushing, daily flossing, and regular dental checkups. Sensodyne helps you brush without pain, but you must still keep the teeth clean. Also, ensure you’re using a soft-bristled toothbrush – a hard brush can cause further enamel abrasion or gum recession, defeating the purpose.
-
Not Addressing the Root Cause: Toothpaste is a management tool, not a cure for underlying issues. If you find that even with Sensodyne, your sensitivity is extreme or worsening, see a dentist. There could be a deep cavity, a cracked tooth, or severe gum recession that needs professional treatment. A common misuse is to self-treat tooth pain that is actually due to a cavity or nerve issue with Sensodyne – this may mask symptoms and delay needed care. Use the toothpaste for true generalized sensitivity (like from mild gum recession, enamel wear, or post-whitening sensitivity). When in doubt, get a dental exam.
-
Safety. Sensodyne is very safe, but if accidentally swallowed in large amounts (more than used for brushing), it can cause stomach upset, so just use the normal pea-size amount and spit it out. By avoiding these missteps and using Sensodyne as directed, you can safely enjoy relief from sensitivity and protect your teeth from further wear or decay.
A brief aside regarding fluoride in toothpaste and drinking water
Naturally occurring fluoride is found in varying concentrations in groundwater in many parts of the world, particularly in regions with high mineral content or volcanic geology.
In the early 20th century, researchers in the United States noticed that residents of certain towns had mottled enamel, a condition known as dental fluorosis, and it was traced to elevated fluoride levels in local water supplies. While the cosmetic effects of high fluoride were obvious, people in those regions also had significantly lower rates of tooth decay.
Epidemiological studies followed, most notably in Colorado Springs and other towns with high fluoride levels, confirming that moderate exposure to naturally fluoridated water correlated with stronger, more decay-resistant teeth.
These findings laid the groundwork for introducing controlled fluoridation of public water supplies starting in the 1940s. Subsequent research reinforced the connection: communities with fluoride levels around 1.0 mg/L in drinking water consistently showed fewer cavities across all age groups compared to non-fluoridated regions. These real-world observations remain one of the strongest public health cases for preventive dentistry.
According to the U.S. Environmental Protection Agency (EPA), fluoride in drinking water becomes toxic when concentrations exceed 4.0 mg/L over long-term exposure. This is the Maximum Contaminant Level (MCL) set to prevent serious outcomes such as skeletal fluorosis—a condition that can cause joint pain, stiffness, and bone abnormalities.
The U.S. Public Health Service recommends 0.7 mg/L as the optimal level for cavity prevention. Between 2.0 and 4.0 mg/L, the primary risk is dental fluorosis in children during tooth development. Skeletal issues typically appear only at higher or chronic levels of exposure:
-
0.7 mg/L = optimal for dental health
-
2.0–4.0 mg/L = may cause dental fluorosis in children
-
4.0 mg/L = risk of skeletal fluorosis and other toxicity
Acute fluoride poisoning from a large, single ingestion is extremely rare and would require ingesting significantly more than what's found in water or toothpaste.
Most adult toothpastes contain 1 to 1.5 mg of fluoride per gram. A typical brushing with a pea-sized amount (about 0.25 g) delivers roughly 0.25 to 0.4 mg of fluoride, depending on the formulation. Some fluoride can be absorbed directly through the oral mucosa, but studies suggest this accounts for less than 10% of exposure. The bulk comes from accidental swallowing, especially in children.
Three factors limit fluoride absorption through the mouth:
-
Minimizing contact time (brushing lasts around two minutes)
-
Dilution by saliva.
-
Binding to enamel surfaces.
In healthy adults who spit out the toothpaste and rinse, systemic absorption is minimal. Children under six, or anyone with swallowing issues, may absorb more, hence the recommendation for pediatric formulations and adult supervision.
Some of the toothpastes I use and recommend contain fluoride. Based on the analysis above, the amount is well below toxic thresholds, and I find it acceptable, especially since we don’t drink or cook with municipal tap water.
Am I against water fluoridation? In principle, yes, because I’m not in favor of playing God with Mother Nature. But when your teeth are already compromised, every legitimate form of protection should be on the table. If my teeth were in perfect shape, I wouldn’t use toothpaste in the first place. But they aren’t, and so I accept the tradeoff.
As far as I’m concerned, losing my teeth poses a far greater risk to my long-term health and quality of life than using fluoridated toothpaste. If this remains a concern for you, there are fluoride-free alternatives. Use your judgment.
Tool #6. Ultra-Soft Toothbrush +
The ultra-soft toothbrush allows you to brush effectively without eroding your gums or enamel, addressing the root cause of many long-term dental issues (like recession and abrasion).
For health-conscious individuals aiming to preserve their natural teeth and avoid frequent dental repairs, this approach is invaluable. It emphasizes prevention and gentle care, reducing the cumulative trauma that “conventional” hard brushes, snap-to-it floss, or chlorinated water might inflict over time.
Clinical consensus backs the effectiveness of soft bristles and daily interdental cleaning, and evidence supports the safety advantages discussed throughout.
The result should be healthier gums, lower risk of cavities and periodontal disease, and ultimately fewer invasive dental interventions as you age. This gentle preventive strategy, grounded in evidence and best practices, can help keep your smile intact and your dental visits happily uneventful for years to come.
Rationale and Benefits
-
Gum Protection: Ultra-soft toothbrushes have extremely fine, soft bristles that minimize mechanical trauma to gum tissue. Using a hard-bristle brush can injure the gums and lead to recession (the gums pulling away from teeth). Research shows people who use hard bristles experience twice as much gingival recession as those who avoid hard brushes. For this reason, dental experts overwhelmingly recommend using brushes with soft or extra-soft bristles to protect the delicate gingiva.
-
Reduced Abrasion: Softer bristles are gentler on tooth enamel and exposed root surfaces. Vigorous brushing with medium or hard bristles, especially combined with abrasive toothpaste, can wear down enamel and cementum over time. A soft or ultra-soft brush, used with proper technique, greatly lowers the risk of abrasive wear on teeth while still cleaning effectively. This helps prevent long-term damage like enamel erosion and tooth sensitivity.
-
Effective Plaque Removal: Despite their gentle feel, ultra-soft brushes can remove plaque and improve gum health comparably to regular soft brushes when used correctly. In a clinical trial, several brands of ultra-soft toothbrushes all significantly reduced plaque levels and bleeding scores from baseline, with no differences in efficacy between brands. In other words, an ultra-soft brush is capable of controlling plaque and gingivitis as long as you have a good technique. It’s worth noting that extremely soft bristles may require slightly more meticulous brushing to achieve the same plaque removal as stiffer bristles – see “How and When To User” below.
-
Ideal for Sensitive Mouths: Ultra-soft toothbrushes are often recommended for individuals with sensitive gums, gum recession, or a history of periodontal disease. They are also beneficial after oral surgery or deep cleaning procedures, when gums may be tender. The gentle bristles can clean plaque at and below the gumline without causing additional irritation, allowing gum tissue to heal. Overall, using an ultra-soft toothbrush is a preventative strategy to avoid the cumulative damage that harder brushes might cause over decades.
How and When to Use
Use an ultra-soft toothbrush at least twice a day (morning and bedtime), or after each meal if possible. The keys are a gentle technique and sufficient time, rather than heavy pressure. Follow these steps for safe and effective brushing:
-
Prepare the Brush: Apply a pea-sized amount of fluoridated toothpaste to the ultra-soft toothbrush. Fluoride helps remineralize enamel and prevent cavities, complementing the gentle mechanical cleaning.
-
Angle at the Gumline: Place the brush at a 45° angle toward the gumline of your teeth (the modified Bass technique). Half of the bristles should rest on the tooth and half on the gum margin. This position allows the soft bristle tips to slide slightly under the gum edge, dislodging plaque from the sulcus, or the shallow groove between tooth and gum.
-
Use Gentle, Small Motions: Using very light pressure similar to massaging the gum rather than scrubbing it, move the brush in small circular or vibratory motions at each tooth site. Ultra-soft bristles will flex and conform to the tooth shape. Avoid aggressive back-and-forth scrubbing, which isn’t necessary and defeats the purpose of a soft brush. Spend a few seconds on each spot so that the plaque is loosened.
-
Cover All Sides: Systematically brush the outer (cheek-facing), inner (tongue-facing), and chewing surfaces of every tooth. Because ultra-soft bristles are very flexible, you may need to allow a bit more time on each surface to ensure plaque is removed. Take care to reach the back molars and behind the front teeth (using the tip of the brush vertically for narrow spaces). Total brushing time should be up to 2 minutes. When the brushing is combined with the water floss (see below), you may use less time.
-
Rinse and Store: Spit out the excess toothpaste and gently rinse your mouth with water. Rinse the toothbrush bristles clean, and store the brush upright to air-dry. Avoid covering it with a cap when wet, as that can encourage bacterial growth in the bristles.
Use this brushing routine twice daily. In the morning, it removes plaque that grows overnight, and at night, it clears the day’s food debris and plaque before sleep (when salivary flow drops, increasing risk of decay and gum issues). Consistency is key: a soft brush used diligently will maintain oral health while preventing the trauma of harsher methods.
Common Mistakes to Avoid
-
Brushing Too Hard: A very common mistake is applying excessive force with an ultra-soft toothbrush because it feels “too soft.” In reality, pressure is what causes damage, not bristle stiffness alone. Even a soft brush can cause gum recession or enamel abrasion if used with heavy force. Press lightly – if the bristles are splaying out or your gum tissue turns white while brushing, you’re pressing too hard. Let the bristles do the work with mild contact.
-
Using the Wrong Technique: Simply scrubbing back-and-forth rapidly, especially on the broad surfaces, will miss plaque at the gum margins and can still abrade teeth. Ensure you use the angled, gentle strokes described above. Another mistake is rushing, not spending enough time. An ultra-soft brush might require a tad longer contact to lift plaque, so don’t skimp on the 2-minute brushing time.
-
Not Replacing the Brush: All toothbrushes wear out, and ultra-soft bristles may fray even sooner due to their delicacy. A frayed brush cleans less effectively and could irritate gums with stray fibers. Replace your toothbrush every 3–4 months, or earlier if the bristles become matted or bent. A good tip is to replace it at the start of each season or after any illness.
-
Expecting Vigorous Scrubbing Feeling: Some people are used to the “scrubby” feel of a medium or hard brush and may think a soft brush isn’t cleaning because it feels gentle. Avoid the temptation to compensate by scrubbing aggressively or switching back to a stiffer brush. The plaque removal may be less tactile, but it is still happening if you use proper technique. One way to tell is by checking your teeth with your tongue after brushing – they should feel smooth and clean, even without the harsh scrubbing sensation.
-
Neglecting Flossing or Interdental Cleaning: Even the best toothbrush (of any kind) only cleans the exposed surfaces of teeth. Ultra-soft brushes excel at the gumline, but they cannot fully clean between teeth. Don’t make the mistake of abandoning floss or other interdental cleaners. Use floss or a water flosser daily to remove plaque between teeth that the brush can’t reach (see next section on water flossers). The combination of gentle brushing and careful interdental cleaning offers the best long-term protection for teeth and gums.
-
Cleaning Between Uses. I recommend soaking all toothbrushes in the 1% peroxide solution weekly to remove bacteria that accumulate during use and storage. Make sure to rinse the toothbrush thoroughly under running water afterward to remove all residue of peroxide.
By using an ultra-soft toothbrush correctly and avoiding these pitfalls, you can safely remove plaque day after day without eroding your enamel or gums. Over the years and decades, this gentle approach can pay dividends in preserving your teeth, gums, and natural smile.
Tool #7. WaterPik Oral Irrigator +
Water flossers, such as the Waterpik®, are an alternative to traditional dental floss for cleaning between the teeth and under the gum margins. They have a handle with a small nozzle that jets water in pulsating bursts.
The idea is to flush out food particles and disrupt plaque in areas a toothbrush can’t reach. For many people, water flossing is more comfortable or practical than string flossing, and it can be very effective for gum health.
I recommend using both. The string floss right after the meal or while eating out, and the water flosser in the morning and before going to sleep. This technique allows me to use the lowest pressure setting, which is key to safe usage, especially when you have active gingivitis, periodontal disease, or right after dental cleaning.
I recommend using a corded model with adjustable water pressure and multiple interchangeable tips. These models allow you to use low-pressure settings, provide enough water volume for a full cleaning, are easier to maintain, and last much longer. The rotatable tips help target areas between teeth and can be fitted with rubber attachments for flushing periodontal pockets. They're also more practical for families, as color-coded tips allow each member to have their own.
You may come across YouTube videos advising the use of the highest possible pressure. Do not follow this advice. I keep the pressure dialed between 0 and 1.
For the same reason, I don’t recommend battery-powered portable flossers. Most don’t have pressure controls, and the built-in reservoirs are too small for a complete rinse. To compensate, they rely on a high-pressure jet that may do more harm than good.
While high-pressure settings can be effective for removing debris, they carry real risks:
-
Gingival Trauma: Excessive water pressure can separate the gum tissue from the tooth, deepening periodontal pockets or creating new ones. That kind of mechanical disruption invites further infection and long-term degradation.
-
Root Exposure and Sensitivity: High pressure on areas with gum recession or exposed dentin can increase tooth sensitivity and discomfort, especially in users with already compromised enamel or thin gingival tissue.
-
False Sense of Hygiene: Some users may rely on high-pressure flossing and skip proper brushing or manual flossing, thinking the water pressure alone is sufficient. It isn’t.
To remove debris before water flossing, use a wet ultra-soft toothbrush and the string floss recommended in the other section.
Low pressure combined with proper technique is safer, more sustainable, and more compatible with sensitive or aging oral tissues, especially when used daily or multiple times per day. Your guidance aligns with clinical caution and long-term preservation.
Rationale and Benefits
-
Improves Interdental Cleaning: A water flosser can reach into the tight spaces between teeth and just below the gumline, areas where brushing misses and where plaque and food debris accumulate. The water jet can penetrate slightly under the gum margin and into interdental crevices, dislodging bacteria and debris. This helps prevent cavities between teeth and fights gingivitis by cleaning the interdental papillae gently. Essentially, it serves the same purpose as a string floss, but using hydrodynamic force rather than scraping.
-
Effective Plaque and Gingivitis Reduction: Clinical evidence shows water flossers are at least as effective as traditional floss at reducing plaque and gum inflammation, and in some cases, even more effective. A 2024 systematic review of studies found that the majority of trials favored water flossers over string floss for plaque reduction, and noted that water flossers clean certain hard-to-access spots better than floss can. Another study demonstrated that a water flosser achieved 87% plaque reduction in a single use, statistically equivalent to regular flossing. Perhaps more importantly, multiple studies report greater improvement in gum health (reduced gingival bleeding) with water flossers, likely because the water jet massages the gums and flushes bacteria from pockets effectively. For individuals who struggle to floss perfectly, a water flosser can provide a reliable level of daily plaque control and gingivitis prevention.
-
Gentle on Gums: When used correctly, water flossing is very gentle on the soft tissues. There’s no risk of cutting the gums or sawing into them, as can happen with improper string floss technique. The pulsating water stream can actually stimulate blood circulation in the gum tissue (a “hydromassage” effect), which may improve gum health. Patients with sensitive or bleeding-prone gums often find water flossers more comfortable. Because it’s gentler, people are more likely to floss regularly, which ultimately improves outcomes.
-
Helpful for Braces, Implants, and Limited Dexterity: Water flossers are especially useful with orthodontic braces, bridges, or dental implants. The water jet can navigate around wires, brackets, and under bridgework to clean areas that string floss can’t reach. Likewise, individuals with limited hand dexterity (arthritis, disabilities) or caregivers assisting someone (such as an elderly parent or child) find the water flosser easier to use than manipulating string floss.
How and When to Use
If you wake up with a bad taste in your mouth, I recommend cleaning between your teeth in the morning, preferably after your first meal, if you're having one. When circumstances allow, evening cleaning before bed is essential to ensure your mouth stays clean overnight. The following instructions will help you use a water flosser correctly and safely.
-
Fill a 0.5-liter (roughly 24 oz) measuring cup with filtered or previously boiled water and add one teaspoon of fine kosher salt (non-iodized). Fine salt dissolves readily without stirring and acts as both a buffering agent and a mild antibacterial.
-
Warm the water in a microwave to just above body temperature. Avoid using cold or hot water, as both can cause sensitivity or discomfort. The exact time and settings will vary depending on room temperature and your microwave’s wattage, so you’ll need to determine them empirically. Microwaving also offers a basic degree of sterilization.
-
Select the tip and pressure: Attach the appropriate nozzle to the handle. Most devices include a standard jet tip for general cleaning and a soft rubber periodontal tip for rinsing beneath the gumline. Some models also offer specialized attachments, such as orthodontic tips for cleaning around braces or dentures. If needed, follow the manufacturer’s instructions for these specific use cases.
I do not recommend using the tongue-scraping attachment. It tends to be too sharp and less effective than using a Radius brush (Tool #2), which is safer and more thorough.
-
Set the pressure control dial to zero. Despite what the manual might suggest, do not exceed the #1 pressure setting. Anything higher risks damaging gum tissue and deepening periodontal pockets.
-
Lean Over the Sink: Before turning the unit on, lean over the sink and place the tip in your mouth. Close your lips most of the way to prevent splashing, but leave enough space for water to drain continuously. Keeping your mouth slightly open allows gravity to help and minimizes mess.
-
Using the Regular Jet Tip: Aim the tip at the gumline where the teeth meet the gums, at about a 90° angle to the tooth surface. Start with the back teeth and move systematically around the arch. Glide the tip slowly along the gumline, pausing briefly between each tooth to flush the interdental spaces.
-
Using the Periodontal Rubber Tip: Position the tip at a 45° angle to the gumline. Begin with the back teeth and trace the gum margins tooth by tooth, just like with the regular tip. Pause between each tooth to ensure thorough flushing of the interdental and subgingival areas.
-
Total Usage Time: On a low-pressure setting, a full-mouth irrigation typically takes around 2 minutes. Refill and continue if needed to reach all areas thoroughly. Take your time around crowded teeth, braces, or problematic gum pockets—these are usually identified by redness at the gum margin or tenderness when the jet tip touches the area. Continue until every interdental space has been flushed.
-
Empty and Clean: Turn the device off before removing it from your mouth. Always empty the remaining water from the reservoir—stagnant water breeds bacteria. Rinse the reservoir and let it air-dry. To clear residual water from the tubing, briefly run the device with the reservoir empty. Detach and rinse the tip, and allow it to dry completely. I sterilize mine every few weeks in hydrogen peroxide, along with my toothbrushes. Replace tips as recommended by the manufacturer.
-
When to Use: Always use the water flosser before brushing. This preserves the therapeutic effect of the toothpaste on tooth surfaces and along the gumline.
In both cases, you’re essentially tracing the contour of each tooth at the gum margin—outside (cheek/lip side) and inside (tongue/palate side), upper and lower. You should not feel the water stream forcefully entering under the gums. If it stings or causes discomfort, reduce the pressure setting or adjust the angle slightly away from the tissue.
Common Mistakes to Avoid
-
Starting at Full Blast: A mistake newcomers often make is cranking the water flosser to the highest pressure setting right away under the assumption that more pressure = better cleaning. In reality, excessively high pressure can be unnecessary and even irritate or damage gum tissue. It’s best to start low and find the lowest effective pressure that cleans well without discomfort. High pressure aimed improperly can also force water deep into the sinuses or cut delicate gum tissue. Gradual, gentle irrigation wins the race for long-term gum health.
-
Poor Aiming/Technique: Simply pointing the jet randomly or failing to trace each interdental space is a common error. You must aim the stream at the gumline crevice between each tooth and sweep around every tooth. If you just blast water straight at the center of your teeth or only rinse your mouth generally, you won’t remove the plaque that matters. Take a systematic approach: follow the gumline around each tooth to ensure no area is skipped. Also, keep the tip close enough to the gumline (around 2 mm away) so that the water has impact – too far and it loses effectiveness, too close and it could splash or injure the gum.
-
Not Using Daily: Consistency is crucial. Using a water flosser occasionally (or only when food is stuck) is far less effective in preventing plaque buildup than daily use. Skipping days allows plaque to mature and harden. Treat water flossing as an essential daily habit like brushing. It only takes 1–2 minutes. Many people find it more pleasant than string flossing, so leverage that and stick to it every day for lasting benefits.
-
Relying on Water Alone for All Cleaning: Remember that water flossing complements brushing; it doesn’t replace it. Some might think that if they water floss, they can be lax with brushing or vice versa. Both tools have distinct roles: brushing (especially with a soft brush) disrupts plaque biofilm on broad surfaces and the gumline, while water flossing cleans between teeth and under the gum edge. For best results, use both. Similarly, while water flossers are very effective, in certain tight contact areas, a strand of floss or an interdental brush might occasionally help (for example, if plaque is heavy or a contact is extremely tight, a quick scrape with floss can dislodge what water might glide over). Be open to combining tools as needed, rather than thinking it must be either/or.
-
Ignoring Device Hygiene: Another mistake is neglecting to clean the water flosser unit. The reservoir and tips can develop mold or bacterial slime over time if not cared for, especially in a humid bathroom environment. Clean the reservoir periodically with mild soap and water, and consider using a vinegar rinse or following manufacturer guidelines to prevent mineral deposits (if using tap water). Replace tips as recommended (every 3–6 months) because they can wear and harbor bacteria. A well-maintained device ensures you’re not introducing unwanted germs into your mouth and that it will function properly long-term.
-
Using Potentially Unsafe Water: This is less common, but worth noting – only use potable, clean water (or a dentist-recommended solution) in your irrigator. Do not fill it with very hot water (risk of burns) or any liquids not intended for oral use. If you wouldn’t drink it, don’t put it in your water flosser. For instance, some people on well water or traveling might consider using filtered or boiled water for added safety (see next section about water quality). Using clean water will avoid any chance of bacterial contamination or excessive chlorine exposure during flossing.
By avoiding these mistakes and using the water flosser as directed, you will gently remove interdental plaque and bacteria each day. Over time, this can lead to healthier gums (less bleeding and inflammation) and can help prevent periodontal issues. Many periodontists include water irrigators as part of home care recommendations for patients – it’s a proven tool for preserving gum health when used properly.
Tool #8. AquaBliss Water Filter Pitcher, or similar +
The quality of the water you use in your daily oral care can also play a role in long-term oral health. Tap water in many areas contains additives (like chlorine) and may pick up impurities (like metals) from pipes. While generally safe to drink, these substances might have cumulative effects on your teeth and gums or affect the performance of oral hygiene devices.

The AquaBliss Water Filter Pitcher is an example of an inexpensive water filtration pitcher that removes many chemicals and contaminants from tap water. Using filtered water for filling your water flosser is a simple step to ensure you are cleaning your mouth with the purest water possible. Here we cover why one might use such a filter, how to use it, and what to avoid.
Rationale and Benefits
-
Removes Chlorine and Chemicals: Municipal tap water is often chlorinated to kill bacteria. Chlorine is great for public health, but it’s a harsh chemical (essentially bleach) that can have drying or irritating effects on oral tissues in frequent exposure. A quality water filter pitcher can remove a significant amount of chlorine from the water. This means when you rinse or water-floss, you’re not exposing your gums to chlorine levels beyond what’s necessary. Reducing chlorine may help those with sensitive oral mucosa or dry mouth issues, and it also improves the taste and odor of water (no “pool water” smell).
-
Filters Out Heavy Metals and Impurities: Importantly, the AquaBliss pitcher’s filter is designed to capture various heavy metals like mercury, copper, cadmium, zinc, and sediment from the water. In older infrastructure, tap water can pick up lead from pipes or other metals; well water can sometimes contain minerals like iron or even arsenic.
Chronic exposure to certain heavy metals is linked not just to general health problems but also to oral health issues – for example, studies have found that people exposed to higher levels of trace heavy metals in drinking water have greater odds of periodontitis (gum disease). By filtering these out, you potentially lower one risk factor for gum inflammation or bone loss. At the very least, you’re ensuring you’re not continuously bathing your gums in substances you “would rather avoid,” as the manufacturer puts it. Over the years, minimizing such exposures aligns with a preventive, health-conscious oral care strategy.
-
Protects Tooth Enamel from Hard Water: In some regions, hard water (high in calcium carbonate and other minerals) can leave scale or deposits. While the primary effect of hard water might be on your appliances, using very hard water for rinsing could contribute to tartar (calculus) buildup or leave a film on teeth. A filter pitcher can moderate water hardness by removing some mineral content (though not all filters soften water completely). This can make the water gentler on your enamel. There’s also an aesthetic benefit: filtered water is clear and won’t leave any residue, so after oral irrigation or rinsing, your teeth feel truly clean.
-
Improves Performance of Oral Devices: Using filtered water in devices like water flossers can prevent mineral buildup inside the unit. Hard water can clog the tiny passages in a Waterpik or lead to lime scale deposits, which might harbor bacteria or reduce the device’s lifespan. The Waterpik company itself notes that if you have very high-mineral content water, it’s wise to use filtered water to avoid such issues. This keeps the water jet strong and the device sanitary over time. In short, filtered water is not only good for your mouth but also for the tools that care for your mouth.
-
General Health and Taste: Although our focus is oral health, it’s worth noting that filtered water is healthier to drink (fewer contaminants) and often tastes better, so you may end up drinking more water, beneficial for saliva production and oral health as well. The AquaBliss pitcher, for instance, also claims to preserve beneficial minerals while removing harmful ones. Notably, most standard carbon filters do not remove fluoride (and AquaBliss confirms that removing fluoride is usually unnecessary). This is a good thing for oral health, since the natural or added fluoride in tap water helps strengthen enamel and prevent cavities. Thus, using the filter pitcher should not negate the protective effects of fluoridated water on your teeth.
How and When to Use
Using a water filter pitcher like the AquaBliss is straightforward and can be easily incorporated into your daily routine:
-
Set Up the Pitcher: If it’s a new filter, follow the product instructions to rinse or soak the filter cartridge as directed before first use. Then insert the filter into the pitcher unit. Ensure all components are clean – it’s a good idea to wash the pitcher and lid with mild soap and water initially.
-
Fill with Tap Water: Pour cold tap water into the top reservoir of the pitcher. It will flow through the filter by gravity. Give it time to fully filter through to the bottom (filtered water chamber) – usually a few minutes for a full reservoir. Most 10-cup pitchers filter a full load in 5–10 minutes. It’s convenient to refill the pitcher after you’ve used it, so that clean water is always ready.
-
Use for Oral Care: Whenever you need water for rinsing or your water flosser, use the filtered water instead of straight tap water. For example, each night when filling the water flosser’s reservoir, pour from the filter pitcher. You can also use this water to rinse your mouth after brushing, or even to brush with (though that might be overkill – tap water for brushing is usually fine since you’re not ingesting much). The main point is that for any prolonged or high-contact use, the filtered water is gentler.
-
Refill as Needed: Keep the pitcher filled regularly. If you do your oral irrigation at night, make sure the pitcher has been refilled earlier in the day or right after last use, so by evening, you have a full supply of filtered water. Some people keep the pitcher on a kitchen counter or in the fridge. Room temperature water is actually nice for flossing (not too cold), but if you prefer the taste cold for drinking, you can refrigerate it and then pour some out in advance of flossing to let it warm slightly.
-
Maintain the Filter: Replace the filter cartridge on the schedule the manufacturer recommends – typically every 4 to 6 months, depending on usage (AquaBliss mentions up to 4 months for their filter because it’s long-lasting. Set a reminder if needed. Using an expired filter can be counterproductive, as it may no longer remove contaminants and can even grow bacteria. Also, periodically clean the pitcher itself (wash the reservoir and jug with dish soap every couple of weeks) to prevent any mildew or biofilm. If the pitcher has a filter-life indicator, keep an eye on it.
-
Optionally, Use for Drinking: Since the pitcher provides cleaner, better-tasting water, you can, of course, use it for drinking water as well. Staying well-hydrated is beneficial for oral health because it promotes healthy saliva flow (your natural defense against cavities and gum disease). So feel free to make the filtered water your go-to for all purposes – it will ensure you maximize the value of the filter and maintain overall health.
In summary, use the filtered water whenever you would otherwise use tap water in your oral care, particularly for the water flosser and final rinsing. There is no strict “timing” needed like morning vs. night – it’s an ongoing supply. Just keep the pitcher handy and filled.
Common Mistakes to Avoid
-
Not Changing Filters Timely: The most common oversight is forgetting to replace the filter cartridge. When the filter is exhausted, it may stop removing contaminants and can even begin to leach trapped substances back into the water. Mark your calendar or set an alert for the expected replacement interval (e.g., “change filter in March, July, November”). Some pitchers drip more slowly when the filter is old – don’t ignore that sign. Using a spent filter defeats the purpose of filtration.
-
Assuming Filter = Sterile Water: Understand that standard carbon filters (like in AquaBliss) are great at removing chemicals (chlorine, metals, etc.), but they do not sterilize the water. If your water source is microbiologically unsafe (bacteria, parasites), a basic pitcher filter won’t make it safe to drink. Fortunately, city tap water in developed regions is treated and generally microbiologically safe. But if you’re using well water or traveling, don’t rely on a simple pitcher to eliminate pathogens – that’s a different level of treatment. This is just to say: use filtered water as an enhancement, not a remedy for seriously contaminated water. For normal tap water, filtered is fine; for questionable water, boil it or use a certified purifier.
-
Letting Water Sit Too Long: Storing filtered water for too long without use can allow some bacterial growth (because once chlorine is removed, the water is actually more prone to harboring microbes if left stagnant). It’s best to use up the filtered water within a day or two. If you fill the pitcher and then don’t use it for a week, it would be wise to discard that water, rinse the pitcher, and filter a fresh batch. In daily practice, if you’re refilling and using it regularly, this won’t be an issue. Just avoid treating the pitcher like a “water storage” for weeks on end.
-
Not Keeping the Pitcher Clean: The pitcher itself can develop biofilm (a thin slime) on its walls over time, especially if kept at room temperature. Every so often (e.g., weekly or biweekly), remove the filter and wash the pitcher with mild soapy water, then rinse well. Also, wipe the lid and any spout. This maintenance prevents any musty odors or microbial growth. Never run the pitcher or filter in high heat (dishwasher) unless the manufacturer explicitly says so, as that could damage it.
-
Expecting Miraculous Differences: Using filtered water is a preventive, precautionary measure. It’s not usually a night-and-day difference that you will feel immediately in your oral health. Don’t expect that using filtered water will cure gum disease or mean you can skip brushing or flossing. Its benefits are subtle and long-term – for example, perhaps slightly less irritation or reducing a risk factor that might contribute to problems over decades. The goal is to minimize any negative exposures (like chlorine, lead, etc.) in line with a health-conscious lifestyle. Some people may notice improved taste and hence drink more water (a good thing), or if your tap water was very hard or chlorinated, you might notice your mouth feels less dry after rinsing with filtered water. But manage expectations: it’s one piece of the puzzle. You still need to maintain excellent oral hygiene with the tools above. Think of filtered water as supporting the effectiveness of your brushing and flossing, rather than replacing any step.
-
Neglecting Fluoride if Filtering Aggressively: As a note, if someone were to use a filter that does remove fluoride (some advanced systems or filters with activated alumina can remove fluoride), they should ensure they get fluoride from other sources (toothpaste, rinses, or professionally applied gels) to protect against cavities. The AquaBliss pitcher doesn’t significantly remove fluoride, so this isn’t a concern in our case. But generally, be aware that you don’t want to lose the decay-preventive benefits of fluoride in the quest for pure water. Balance is key.
By using a filtered water pitcher correctly and avoiding these missteps, you add an extra layer of protection and care to your oral hygiene routine. It ensures that the water aiding your oral care is as pure and gentle as possible, aligning with the overall goal of minimizing harm while maximizing health in the long run.
It goes without saying that lasting oral health is nearly impossible to achieve without also addressing functional digestive disorders. The respiratory tract, mouth, and gastrointestinal lining are really just different branches of the same mucosal highway — one continuous organ, not three. Inflammation in any part of it tends to ripple through the rest. Fix one, and you often fix the others. Ignore one, and they all get dragged down.
For this reason, I recommend taking time to explore the rest of this site, especially the sections covering functional colorectal disorders, such as constipation, dysbacteriosis, and IBS. They are all connected.
Optimistic Conclusions
Incorporating these tools and techniques into your daily routine can significantly improve oral health in a sustainable and non-intrusive way. Each tool addresses a distinct aspect of hygiene, forming a comprehensive method for cleaning all tooth and gum surfaces while reducing the risk of irritation or damage.
This regimen is practical, inexpensive, and well-suited for anyone who wants to retain their natural teeth for life and avoid unnecessary dental interventions. With consistent application and proper technique, the result is healthier gums, fewer or no cavities, a much lower risk of periodontal disease, and a reduced need for costly dental procedures over time.
Frequently Asked Questions 
Q. Can gum recession be reversed, or is it permanent?+
Gum recession is mostly irreversible despite numerous videos on YouTube claiming otherwise. Once the gum tissue recedes, it doesn't grow up naturally.
The best approach is prevention: avoid aggressive brushing, harsh floss, and abrasive pastes. You can halt further recession and sometimes tighten the gum seal to reduce pockets by switching to an ultra-soft toothbrush and adopting gentle techniques.
That's the foundation of my methodology. In more advanced cases, a periodontist may recommend surgical options, but my aim is to help you avoid needing those. I, too, had very deep pockets in the past, but right now they are quite tight to the surprise of my dentist.
Q. Are there natural or homemade alternatives to any of the recommended products?+
Yes, you can use homemade solutions in some cases. For example, baking soda can support pH balance; peroxide (diluted to 1%) can disinfect brushes; and a simple saltwater rinse (1% to 1.5%) helps soothe gums.
The principles behind these alternatives are the same — reduce irritation, neutralize acids, and avoid harsh chemicals. However, homemade products rarely match the convenience and consistency of the professionally formulated ones I recommend.
Q. Should I use an electric or manual ultra-soft toothbrush for the best results?+
The most critical factor is softness, not whether it's electric or manual. I prefer manual ultra-soft brushes because they force you to slow down and use gentle motions, reducing the risk of abrasion. Some electric brushes come with ultra-soft heads — these are fine if you stick to the lowest pressure setting, don't over-brush, and use non-abrasive toothpaste. What matters most is technique: light pressure, proper angle, and at least two minutes, twice a day.
Q. Is it safe to use a water flosser if I have loose teeth, recent dental surgery, or severe gum disease?+
Yes, but only on the lowest pressure settings. I've seen people overdo it after dental procedures or with compromised gum tissue. When in doubt, consult your dentist, and always start on the gentlest setting. Avoid high-pressure jets: these can further irritate or harm tissues that are already vulnerable. In my routine, a water flosser on "0–1" cleans gently and helps with healing.
I've seen some videos on YouTube with dentists recommending using water flossers at the highest pressure. Ignore that nonsense. Even the water jet dentists use in their offices is similar to 0 settings on my WaterPick flosser.
Q. What should I do if my gums bleed even after following these oral care protocols?+
Mild bleeding is common when you first start proper flossing or brushing with soft bristles. It's a sign the gums are inflamed but healing. If bleeding persists beyond two weeks of gentle, consistent care or worsens, see a dentist to rule out deeper infection or injury. Don't stop flossing or brushing: gentle persistence almost always toughens the gums and stops the bleeding.
Q. Are there specific recommendations for oral care in children, the elderly, or those with braces?+
I am not an expert on this topic. In general, children benefit most from using gentle brushing and avoiding abrasive toothpaste. For elderly or people with mobility issues, I recommend ultra-soft electric toothbrushes and water flossers set to very low pressure. Braces and implants need extra attention: floss threaders, special tips for water flossers, and thorough cleaning at the gumline. The main idea: adapt the tools, not the principles — gentle and consistent care always wins.
Q. How should this routine be adapted for people with dental implants, bridges, or dentures?+
Dental implants and bridges are more vulnerable to plaque buildup at connection points. Use gentle floss or interdental brushes, plus water flossers with rubber tips if your dentist recommends them. For dentures, clean daily with non-abrasive cleaners and never neglect your gums. The whole aim is to prevent inflammation and micro-trauma — mechanical cleaning, not harsh scrubbing.
Q. Is it possible to over-clean my teeth and gums, and what signs should I watch for?+
Absolutely. Most damage I've seen comes from "doing too much" — heavy-handed brushing, hard bristles, strong pressure on floss or irrigators. If your gums look pale, recede, or you get sensitivity in your teeth, ease up. Think massage, not scrubbing. Soft tools and slow motions are your best friends.
Q. How soon should I expect to see improvements in gum health or bad breath after starting this regimen?+
If you switch to proper technique with the right products, you'll usually notice fresher breath and less morning "mouth" in a week, tougher gums in two weeks, and reduced sensitivity in a month. Remember, long-term healing, like tightening gums or reducing pockets, is gradual. Stick with it for at least three months before judging your outcome.
Q. What symptoms indicate I should see a dentist, even if I follow this protocol?+
Pain or bleeding that doesn't resolve quickly, swelling of the gums or tonque, loose teeth, or any spot that smells bad despite thorough cleaning. Those are all signs you need professional care. My goal is to help you minimize those visits, but if one of these red flags pops up, go!
Q. Can oral supplements interact with prescription medications or other health conditions?+
Most basic oral health supplements (like vitamins D, K2, or magnesium) are well tolerated. That said, always cross-check with your doctor or pharmacist if you take blood thinners, heart drugs, or have chronic illnesses. When in doubt, start slow and watch for changes in your overall health.
Q. What should I do if I travel and can't bring all these oral care products or devices?+
Traveling simply means adapting. I take a soft travel toothbrush, a small tube of SLS-free toothpaste for sensitive teeth (Sensodine), and string floss like I described above. If you lose access to your water flosser or mouth rinse, just fall back on gentle brushing and flossing — they're enough for short stints. Avoid high-sugar and acidic snacks on the road. There are portable wireless water flossers on the market, and they all run at very high pressure. I wasn't able to find one that has a pressure regulator.
Author's Note
Thanks to the immense talent of my late dentist, a habit of overthinking everything, and being a medical writer, researcher, and nutritional consultant, I got lucky, and the outcomes of that luck are reflected on this page.
My relative success with saving my teeth isn’t a miracle but the kind of common sense we all wish we had and followed back when our teeth and gums were still pristine, but it's never too late to start for anyone else and to keep what hasn't been lost yet.
***
If this free article gave you insight into a topic rarely covered by mainstream medical media objectively and in similar depth, that's no accident. I work independently and have no financial ties to pharmaceutical companies, hospitals, or institutional sponsors.
That independence allows me to present the facts without having to serve anyone's agenda. If you find this approach valuable for your well-being, the best way to support my work is by sharing this article with others.
Every repost, forward, or mention helps amplify the reach and makes future work like this possible. Thank you for taking the time to read and for supporting my work!
Konstantin Monastyrsky